搜尋此網誌

2010年1月25日 星期一

Silverlight & Game:Puzzlies - Part 2


執行結果
下載原始檔


前一篇已將Puzzles中移動區塊的功能寫畢,接著我們加入「打散」的動作。

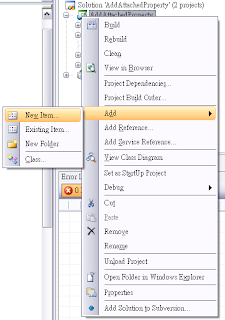
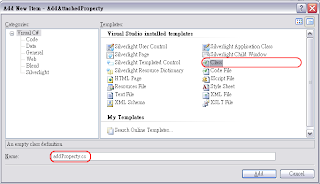
1.同前一篇的步驟新增一個類別,並命名為「shuffle」

shuffle.cs

using System;
using System.Net;
using System.Windows;
using System.Windows.Controls;
using System.Windows.Documents;
using System.Windows.Ink;
using System.Windows.Input;
using System.Windows.Media;
using System.Windows.Media.Animation;
using System.Windows.Shapes;

namespace ImageClip_Puzzles
{
 public class shuffle
 {
  Random r = new Random();
  public void randomMove(
   imageBox[] ibArray,int[,] posArr,int count,
   int imageSize,int gridWidth){
  for (int i = 0; i < count; i++)
  {
   int moveValue = addMove();
   int moveIndex = 0;
   if (r.Next(0, 2) == 0)//do x
   {
    if (moveValue < 0) // '-'
    {
     if (ibArray[0].colIndex <= 0)
     {
       moveIndex = posArr[ibArray[0].rowIndex,
       ibArray[0].colIndex + 1];
       posArr[ibArray[0].rowIndex,
           ibArray[0].colIndex + 1] = 0;
       posArr[ibArray[0].rowIndex,
           ibArray[0].colIndex] = moveIndex;
     }
     else
     {
      moveIndex = posArr[ibArray[0].rowIndex,
      ibArray[0].colIndex - 1];
      posArr[ibArray[0].rowIndex,
          ibArray[0].colIndex - 1] = 0;
      posArr[ibArray[0].rowIndex,
          ibArray[0].colIndex] = moveIndex;
     }
    }
    else // '+'
    {
     if (ibArray[0].colIndex >= (gridWidth - 1))
     {
      moveIndex = posArr[ibArray[0].rowIndex,
                ibArray[0].colIndex - 1];
      posArr[ibArray[0].rowIndex,
          ibArray[0].colIndex - 1] = 0;
      posArr[ibArray[0].rowIndex,
          ibArray[0].colIndex] = moveIndex;
     }
     else
     {
      moveIndex = posArr[ibArray[0].rowIndex,
                ibArray[0].colIndex + 1];
      posArr[ibArray[0].rowIndex,
          ibArray[0].colIndex + 1] = 0;
      posArr[ibArray[0].rowIndex,
          ibArray[0].colIndex] = moveIndex;
     }
    }
   }
   else // do y
   {
    if (moveValue < 0) // '-1' = 'down'
    {
     if (ibArray[0].rowIndex <= 0) // move down (r+)
     {
      moveIndex =
       posArr[ibArray[0].rowIndex + 1, ibArray[0].colIndex];
      posArr[ibArray[0].rowIndex + 1,
          ibArray[0].colIndex] = 0;
      posArr[ibArray[0].rowIndex,
          ibArray[0].colIndex] = moveIndex;
     }
     else // move up (r-)
     {
      moveIndex =
       posArr[ibArray[0].rowIndex - 1, ibArray[0].colIndex];
      posArr[ibArray[0].rowIndex - 1,
          ibArray[0].colIndex] = 0;
      posArr[ibArray[0].rowIndex,
          ibArray[0].colIndex] = moveIndex;
     }
    }
    else // '1' = 'up'
    {
     if (ibArray[0].rowIndex >= (gridWidth - 1))
     {
      moveIndex =
       posArr[ibArray[0].rowIndex - 1, ibArray[0].colIndex];
      posArr[ibArray[0].rowIndex - 1,
          ibArray[0].colIndex] = 0;
      posArr[ibArray[0].rowIndex,
          ibArray[0].colIndex] = moveIndex;
     }
     else
     {
      moveIndex =
       posArr[ibArray[0].rowIndex + 1, ibArray[0].colIndex];
      posArr[ibArray[0].rowIndex + 1,
          ibArray[0].colIndex] = 0;
      posArr[ibArray[0].rowIndex,
          ibArray[0].colIndex] = moveIndex;
     }
    }
   }
   int tmpColIndex = ibArray[moveIndex].colIndex;
   int tmpRowIndex = ibArray[moveIndex].rowIndex;
   ibArray[moveIndex].moveToDirectly(
             ibArray[0].rowIndex - tmpRowIndex,
             ibArray[0].colIndex - tmpColIndex);
   ibArray[0].moveToDirectly(
             tmpRowIndex - ibArray[0].rowIndex,
             tmpColIndex - ibArray[0].colIndex);
   }
  }
  public int addMove()
  {
   if (r.Next(0, 2) == 0)// '+'
   {
    return 1;
   }
   else // '-'
   {
    return -1;
   }
  }
 }
}


除了打散圖片區塊會使用到的.cs檔以外,我還需要在原本的程式中插入幾個Function:
MainPage.xaml.cs
1.加入全域變數int[,] imagePos。
2.新增shuffle物件。

 int[,] imagePos;//use in postion record
 shuffle shu = new shuffle();

3.在 loadImg(),Function最尾端加入以下程式內容:

shu.randomMove(IBArray, imagePos, 50, imageSize, gridNum);


a.在程式執行前先建立了一個名為shu的shuffle物件。
b.程式將圖片區塊建立結束後,使用shuffle物件打散圖片區塊的位置。
c. 參數: randomMove(圖片區塊陣列,當前圖片區塊位置,圖片打散移動次數,圖片圖素大小,寬度)
2010年1月20日 星期三

Silverlight & Game:Puzzlies - Part 1

寫個Puzzlies小遊戲吧!
遊戲內容非常單純,移動3 x 3或 N x N的圖片區塊,恢復為完整的圖即成功。

本篇內容,先建立Puzzles的骨架及基本動作,其中我們一共會建立兩個 .xaml檔及一個.cs檔,另外需匯入一張圖片,檔案名稱如下:
 a. MainPage.xaml
 b. imageBox.xaml
 c. myRecorder.cs
 d. 圖片:imgs/Orz.png
(置於 imgs 資料夾之下)

1.建立一個新的Silverlight Applciation專案,在這裡我將專案名稱命為「ImageClip_Puzzlies」,以下為完整MainPage.xaml內容:

<UserControl x:Class="ImageClip_Puzzles.MainPage"
 xmlns="http://schemas.microsoft.com/winfx/2006/xaml/presentation"
 xmlns:x="http://schemas.microsoft.com/winfx/2006/xaml"
 xmlns:d="http://schemas.microsoft.com/expression/blend/2008"
 xmlns:mc="http://schemas.openxmlformats.org/markup-compatibility/2006"
 mc:Ignorable="d" d:DesignWidth="640" d:DesignHeight="480" Loaded="loadImg">
 <Grid  Background="Gray" Width="500" Height="500"
    VerticalAlignment="Center" HorizontalAlignment="Center" >
  <Grid x:Name="PuzzlesTop" >
   <Grid.ColumnDefinitions>
    <ColumnDefinition Width="10"/>
    <ColumnDefinition Width="*"/>
    <ColumnDefinition Width="10"/>
  </Grid.ColumnDefinitions>
  <Grid.RowDefinitions>
   <RowDefinition Height="10"/>
   <RowDefinition Height="*"/>
   <RowDefinition Height="10"/>
  </Grid.RowDefinitions>
   <Grid Grid.Column="1" Grid.Row="1">
    <Rectangle Fill="Black"/>
   </Grid>
  </Grid>
  <TextBlock Text="sys" x:Name="sysMsg" FontSize="12"
      VerticalAlignment="Top" HorizontalAlignment="Center">
   <TextBlock.RenderTransform>
    <TranslateTransform X="0" Y="-20"/>
   </TextBlock.RenderTransform>
  </TextBlock>
 </Grid>    
</UserControl>

2.接著是imageBox.xaml的內容:

<UserControl x:Class="ImageClip_Puzzles.imageBox"
 xmlns="http://schemas.microsoft.com/winfx/2006/xaml/presentation"
 xmlns:x="http://schemas.microsoft.com/winfx/2006/xaml"

 Width="Auto" Height="Auto" x:Name="imageTop"  >    
 <Canvas Height="600" Width="600" x:Name="imageCanvas">
  <Canvas.Resources>
   <Storyboard x:Name="moveImage_Direct_Up" SpeedRatio="5">
    <DoubleAnimation x:Name="UpAnima"
     Storyboard.TargetName="imageGrid"
     Storyboard.TargetProperty="(Canvas.Top)"
     From="0" To="0" Duration="0:0:1"  AutoReverse="False"/>
    <DoubleAnimation x:Name="borderAnima_Up"
     Storyboard.TargetName="imageBorder"
     Storyboard.TargetProperty="(Border.RenderTransform).Y"
     From="0" To="0" Duration="0:0:1" AutoReverse="False"/>
   </Storyboard>
   <Storyboard x:Name="moveImage_Direct_Left" SpeedRatio="5">
    <DoubleAnimation x:Name="LeftAnima"
     Storyboard.TargetName="imageGrid"
     Storyboard.TargetProperty="(Canvas.Left)"
     From="0" To="0" Duration="0:0:1"  AutoReverse="False"/>

    <DoubleAnimation x:Name="borderAnima_Left"
     Storyboard.TargetName="imageBorder"
     Storyboard.TargetProperty="(Border.RenderTransform).X"
     From="0" To="0" Duration="0:0:1" AutoReverse="False"/>
   </Storyboard>
  </Canvas.Resources>
  <Grid Canvas.Top="0" Canvas.Left="0"
   Width="480" Height="480" x:Name="imageGrid" >
   <Image Source="imgs/Orz.png" Stretch="Fill" x:Name="imageContent">
    <Image.Clip>
     <RectangleGeometry Rect="0,0,160,160 " >
     <RectangleGeometry.Transform>
      <TranslateTransform X="0" Y="0" x:Name="ImageAreaTransform"/>
     </RectangleGeometry.Transform>
     </RectangleGeometry>
    </Image.Clip>
   </Image>
  </Grid>
  <Border BorderBrush="#FF666666" BorderThickness="5" x:Name="imageBorder">
   <Border.RenderTransform>
    <TranslateTransform X="0" Y="0" x:Name="boardPosition"/>
   </Border.RenderTransform>
   <Rectangle x:Name="imageColor"
    Width="155" Height="155" Fill="Red" Opacity="0.01"/>
  </Border>
  <Grid Visibility="Visible">
   <Grid.RenderTransform>
    <TranslateTransform X="5" Y="10" x:Name="msgPos"/>
   </Grid.RenderTransform>
   <Grid.RowDefinitions>

    <RowDefinition Height="14"/>
    <RowDefinition Height="14"/>
    <RowDefinition Height="14"/>
    <RowDefinition Height="14"/>
    <RowDefinition Height="14"/>
   </Grid.RowDefinitions>
   <TextBlock x:Name="imgSysMsg1" Text="" FontSize="12" Grid.Row="0"/>
   <TextBlock x:Name="imgSysMsg2" Text="" FontSize="12" Grid.Row="1"/>
   <TextBlock x:Name="imgSysMsg3" Text="" FontSize="12" Grid.Row="2"/>
   <TextBlock x:Name="imgSysMsg4" Text="" FontSize="12" Grid.Row="3"/>
   <TextBlock x:Name="imgSysMsg5" Text="" FontSize="12" Grid.Row="4"/>
  </Grid>
 </Canvas>
</UserControl>


3.別忘了 mainPage.xamlimageBox.xaml的 .cs內容:

mainPage.xaml

using System;
using System.Collections.Generic;
using System.Linq;
using System.Net;
using System.Windows;
using System.Windows.Controls;
using System.Windows.Documents;
using System.Windows.Input;
using System.Windows.Media;
using System.Windows.Media.Animation;
using System.Windows.Shapes;

namespace ImageClip_Puzzles
{
 public partial class MainPage : UserControl
 {
  private void SysMsg(string msg)
  {
   sysMsg.Text = msg;
  }
  int gridNum = 3;
  int imageSize = 160;
  Point[,] imagePos;
  imageBox[] IBArray;

  public MainPage()
  {
   InitializeComponent();
  }
  private void loadImg(object sender, RoutedEventArgs e)
  {
   imagePos = new Point[gridNum, gridNum];
   IBArray = new imageBox[gridNum * gridNum];
   for (int i = 0; i < gridNum; i++)
   {
    for (int j = 0; j < gridNum; j++)
    {
     imageBox ib = new imageBox();
     int indexOfAll = i * gridNum + j;
     IBArray[indexOfAll] = ib;

     ib.MouseLeftButtonDown += onImageClick;
     ib.moveImage_Direct_Up.Completed += moveIsFinish;
     ib.moveImage_Direct_Left.Completed += moveIsFinish;

     ib.setInfo(indexOfAll,i, j, gridNum, imageSize);
     PuzzlesTop.Children.Add(ib);
     ib.setGridPosition(1, 1);
     imagePos[i, j] =
      new Point(j * imageSize, i * imageSize);
}
}
BArray[0].setImageColor(0xFF, 0x00, 0x00);
}
bool imgIsMoving = false;
private void onImageClick(object sender, MouseButtonEventArgs e)
{
SysMsg("imgIsMoving : " + imgIsMoving.ToString());
if (imgIsMoving) return;
imgIsMoving = true;
imageBox uc = sender as imageBox;
string dir = getPic1(IBArray[uc.indexOfAllIBArray].rowIndex,
IBArray[uc.indexOfAllIBArray].colIndex);
uc.moveImageTo(dir);
switch (dir)
{
case "up":
IBArray[0].moveImageTo("down");
break;
case "down":
IBArray[0].moveImageTo("up");
break;
case "left":
IBArray[0].moveImageTo("right");
break;
case "right":
IBArray[0].moveImageTo("left");
break;
default:
imgIsMoving = false;
break;
}
}
private void moveIsFinish(object sender, EventArgs e)
{
Storyboard sb = (Storyboard)sender;
imageBox tmpImageBox =
(imageBox) sb.GetValue(myRecorder.record_ImageBox);
if (tmpImageBox.indexOfAllIBArray == 0) return;
int tmpRIndex = tmpImageBox.rowIndex;
int tmpCIndex = tmpImageBox.colIndex;

tmpImageBox.resetCurrentPosition(IBArray[0].rowIndex,
IBArray[0].colIndex);
IBArray[0].resetCurrentPosition(tmpRIndex, tmpCIndex);

imgIsMoving = false;
}
private string getPic1(int r, int c)
{
if (((r - 1) == IBArray[0].rowIndex)
&& (c == IBArray[0].colIndex))
// at down of Pic0 - - -> (r-1,c) then the imagemove 'up'
{
return "up";
}
else if (((r + 1) == IBArray[0].rowIndex)
&& (c == IBArray[0].colIndex))
//at top of Pic0 - - -> (r+1,c) then the image move 'down'
{
return "down";
}
else if ((r == IBArray[0].rowIndex)
&& ((c-1) == IBArray[0].colIndex))
//at right of Pic0 - - -> (r,c-1) then the image move 'left'
{
return "left";
}
else if ((r == IBArray[0].rowIndex)
&& ((c + 1) == IBArray[0].colIndex))
{
return "right";
}
else
{
return "stay";
}
}
private void showImageBoxMsg(imageBox ib)
{
ib.SysMsg("ib name : " + ib.Name,
    ", indexOfArrlyIBArray : " + ib.indexOfAllIBArray.ToString(),
    ", IBArray postion on " + ib.indexOfAllIBArray.ToString(),
    ", rowIndex : " + IBArray[ib.indexOfAllIBArray].rowIndex.ToString(),
    ", cowIndex : " + IBArray[ib.indexOfAllIBArray].colIndex.ToString());
}
}
} 


imageBox.xaml

using System;
using System.Collections.Generic;
using System.Linq;
using System.Net;
using System.Windows;
using System.Windows.Controls;
using System.Windows.Documents;
using System.Windows.Input;
using System.Windows.Media;
using System.Windows.Media.Animation;
using System.Windows.Shapes;

namespace ImageClip_Puzzles
{
public partial class imageBox : UserControl
{
 int separaNum = 3;
 int imgSize = 160;
 public int rowIndex = 0;
 public int colIndex = 0;
 public int orgiRowIndex = 0;
 public int orgiColIndex = 0;
 public int indexOfAllIBArray = 99;

 Point currentBorderPosition = new Point();
 public imageBox()
 {
  InitializeComponent();
 }
 public void setInfo(int indexOfArray,int rIndex,
      int cIndex,int separateNum,int imageSize)
 {
  indexOfAllIBArray = indexOfArray;
  separaNum = separateNum;
  imgSize = imageSize;
  imageUV(rIndex, cIndex);
  this.Name =
   "R(" + rIndex.ToString() + ")C(" + cIndex.ToString() + ")";
  rowIndex = rIndex;
  colIndex = cIndex;
  orgiRowIndex = rIndex;
  orgiColIndex = cIndex;
  animaRecordInfo(indexOfArray);
 }
 private void animaRecordInfo(int index)//, string name)
 {
  moveImage_Direct_Up.SetValue(myRecorder.record_ImageBox, this);
  moveImage_Direct_Left.SetValue(myRecorder.record_ImageBox, this);
 }
 private void imageUV(int indexU,int indexV)
 {
  ImageAreaTransform.X = indexV * 160;
  ImageAreaTransform.Y = indexU * 160;
  this.boardPosition.X = ImageAreaTransform.X;
  this.boardPosition.Y = ImageAreaTransform.Y;
  currentBorderPosition =
     new Point(ImageAreaTransform.X,ImageAreaTransform.Y);
  msgPos.X = ImageAreaTransform.X;
  msgPos.Y = ImageAreaTransform.Y;
 }
 public void setGridPosition(int rowIndex, int colIndex)
 {
  this.SetValue(Grid.RowProperty, rowIndex);
  this.SetValue(Grid.ColumnProperty, colIndex);
 }
 public void setImageColor(byte r, byte g, byte b)
 {
  Color c = Color.FromArgb(255, r, g, b);
  imageColor.Fill = new SolidColorBrush(c);
  imageColor.Opacity = 0.7;
 }
 public void SysMsg(string msg)
 {
  imgSysMsg1.Text = msg;
 }
 public void SysMsg(string msg1, string msg2)
 {
  imgSysMsg1.Text = msg1;
  imgSysMsg2.Text = msg2;
 }
 public void SysMsg(string msg1, string msg2, string msg3)
 {
  imgSysMsg1.Text = msg1;
  imgSysMsg2.Text = msg2;
  imgSysMsg3.Text = msg3;
 }
 public void SysMsg(string msg1, string msg2,
           string msg3, string msg4)
 {
  imgSysMsg1.Text = msg1;
  imgSysMsg2.Text = msg2;
  imgSysMsg3.Text = msg3;
  imgSysMsg4.Text = msg4;
 }
 public void SysMsg(string msg1, string msg2,
           string msg3, string msg4, string msg5)
 {
  imgSysMsg1.Text = msg1;
  imgSysMsg2.Text = msg2;
  imgSysMsg3.Text = msg3;
  imgSysMsg4.Text = msg4;
  imgSysMsg5.Text = msg5;
 }
 public void moveImageTo(string dir)
 {
  SysMsg("");
  switch (dir)
  {
   case "up":
    this.UpAnima.From =
     Convert.ToDouble( imageGrid.GetValue(Canvas.TopProperty));
    this.UpAnima.To = this.UpAnima.From - imgSize;
    this.borderAnima_Up.From = this.boardPosition.Y;
    this.currentBorderPosition.Y -= imgSize;
    this.borderAnima_Up.To = this.currentBorderPosition.Y;
    this.moveImage_Direct_Up.Begin();
    break;
   case "down":
    this.UpAnima.From =
     Convert.ToDouble(imageGrid.GetValue(Canvas.TopProperty));
    this.UpAnima.To = this.UpAnima.From + imgSize;
    this.borderAnima_Up.From = this.currentBorderPosition.Y;
    this.currentBorderPosition.Y += imgSize;
    this.borderAnima_Up.To = this.currentBorderPosition.Y;
    this.moveImage_Direct_Up.Begin();
    break;
   case "left":
    this.LeftAnima.From =
     Convert.ToDouble(imageGrid.GetValue(Canvas.LeftProperty));
    this.LeftAnima.To = this.LeftAnima.From - imgSize;
    this.borderAnima_Left.From = this.currentBorderPosition.X;
    this.currentBorderPosition.X -= imgSize;
    this.borderAnima_Left.To = this.currentBorderPosition.X;
    this.moveImage_Direct_Left.Begin();
    break;
   case "right":
    this.LeftAnima.From = Convert.ToDouble(imageGrid.GetValue(Canvas.LeftProperty));
    this.LeftAnima.To = this.LeftAnima.From + 160;
    this.borderAnima_Left.From =
      this.currentBorderPosition.X;
    this.currentBorderPosition.X += imgSize;
    this.borderAnima_Left.To =
      this.currentBorderPosition.X;
    this.moveImage_Direct_Left.Begin();
    break;
   default:
    SysMsg("default in dir");
    break;
  }
  msgPos.X = this.currentBorderPosition.X + 5;
  msgPos.Y = this.currentBorderPosition.Y + 10;


 }
 public void resetCurrentPosition(int r,int c)
 {
  this.rowIndex = r;
  this.colIndex = c;
 showInfo();
 }
 public void showInfo()
 {
  SysMsg("boardPosition(X,Y): (" + this.boardPosition.X.ToString() +
    ","+ this.boardPosition.Y.ToString() +")",
   "TopLeft: (" + imageGrid.GetValue(Canvas.TopProperty).ToString() +
   "," + imageGrid.GetValue(Canvas.LeftProperty).ToString() ,
   "RowIndex : " + this.rowIndex.ToString(),
   "ColIndex : " + this.colIndex.ToString(),
   "name : "+this.Name);
 }
}
}


4.最後是 myRecorder.cs 的內容:

using System;
using System.Net;
using System.Windows;
using System.Windows.Controls;
using System.Windows.Documents;
using System.Windows.Ink;
using System.Windows.Input;
using System.Windows.Media;
using System.Windows.Media.Animation;
using System.Windows.Shapes;

namespace ImageClip_Puzzles
{
 public class myRecorder
 {
  public static readonly DependencyProperty record_ImageBox =
   DependencyProperty.RegisterAttached(
    "recordImageBox",
    typeof(imageBox),
    typeof(myRecorder),
    null);
  public static void recordImageBox(DependencyObject obj,
                   imageBox ib)
  {
   obj.SetValue(record_ImageBox, ib);
  }
  public static imageBox readImageBox(DependencyObject obj)
  {
   return (imageBox)obj.GetValue(record_ImageBox);
  }
 }
}


先前已有介紹如何在Silverlight元件裡額外加入一個屬性,「myRecorder.cs」的內容即新增的屬性的Class。

就本篇內容來說,遊戲時「圖片區塊的移動」的動作已寫好。此外為了除蟲方便,程式中加入了「SysMsg」Function,執行時我們能夠簡單看到目前圖片位置的屬性值。


執行結果

Silverlight with C#:★★★ Attached Property ★★★

『對Silverlight元件增加額外的屬性』,在許多地方都非常之好用:
1.對專案新增一個 .cs 檔案:


在此對新增的Class命名為「addedProperty」


2.addProperty.cs最初內容為:

public class addProperty // class name : the property class
{
}

請加入以下內容:

public static readonly DependencyProperty addedMsg =
    DependencyProperty.RegisterAttached(
  //Name of the property
  "addedProperty",
  //Type of the property
  typeof( bool ),
  //Type of the provider of the registered attached property
  typeof( addProperty ),
  //Callback invoked in case the property value has changed
  null );
public static readonly DependencyProperty addedMsg2 =
    DependencyProperty.RegisterAttached(
  "addedProperty2",
  typeof(string),
  typeof(addProperty),
  null);


3.接著測試程式能否加入此Attached Property,先在主要的 .xmal檔中加入以下內容:

<Grid x:Name="LayoutRoot">
<TextBlock x:Name="myText" Text="message" Loaded="onLoad"/>
</Grid>


4.加入「onLoad」function,簡單的產生一個Silverlight元件以測試結果。:

private void onLoad(object sender, RoutedEventArgs e)
{
 myText.SetValue(addProperty.addedMsg, false);
 MessageBox.Show(myText.GetValue(addProperty.addedMsg).ToString());
 myText.SetValue(addProperty.addedMsg2, "my name is Creat");
 MessageBox.Show(myText.GetValue(addProperty.addedMsg2).ToString());
}


在Attached Property裡,第一個屬性為 bool,第二個屬性為 string,程式載入後,以MessageBox顯示我們在執行中加入的Property.你甚至可以加入C#中的Object或是Silverlight元件所屬頂層Object.

2010年1月18日 星期一

Silverlight:Image U,V -- Part 3

本篇再介紹一種動態Clip Image的方法,先將以下程式碼加入UserControl:

<Grid x:Name="LayoutRoot" Background="Gray" MouseLeftButtonUp="onUp"
  VerticalAlignment="Center" HorizontalAlignment="Center">
 <Grid.RowDefinitions>
  <RowDefinition Height="5"/>
  <RowDefinition Height="300"/>
  <RowDefinition Height="5"/>
 </Grid.RowDefinitions>
 <Grid.ColumnDefinitions>
  <ColumnDefinition Width="5"/>
  <ColumnDefinition Width="300"/>
  <ColumnDefinition Width="5"/>
 </Grid.ColumnDefinitions>
 <Grid Grid.Row="1" Grid.Column="1">
  <Rectangle x:Name="posRect"/>
  <Image x:Name="img_show" Stretch="Fill"
    Source="imgs/Orz.png" Opacity="0.9">
   <Image.Clip>
    <RectangleGeometry Rect="0,0,100,100">
     <RectangleGeometry.Transform>
      <TranslateTransform X="0" Y="0" x:Name="clipPosCtrl"/>
     </RectangleGeometry.Transform>

    </RectangleGeometry>
   </Image.Clip>
  </Image>
  <Image x:Name="img_bg" Stretch="Fill"
    Source="imgs/Orz.png" Opacity="0.1"
    MouseLeftButtonDown="onDown" MouseMove="onMove"/>
 </Grid>
</Grid>


接著加入以下程式碼至 .cs中:

private void onDown(object sender, MouseButtonEventArgs e)
{
 mouseIsClick = true;
}
 bool mouseIsClick = false;
private void onUp(object sender, MouseButtonEventArgs e)
{
 mouseIsClick = false;
}
private void onMove(object sender, MouseEventArgs e)
{
 if(!mouseIsClick) return;
 clipPosCtrl.X = e.GetPosition(posRect).X - 50;
 clipPosCtrl.Y = e.GetPosition(posRect).Y - 50;
}


本篇同part 1,使用了兩個Image,上層Image做事件的觸發,下層Image顯示效果,其中主要由

 <RectangleGeometry.Transform>
  <TranslateTransform X="0" Y="0" x:Name="clipPosCtrl"/>
 </RectangleGeometry.Transform>

來控制Clip的效果。

執行結果

2010年1月17日 星期日

Silverlight:Image U,V  -- Part 2

以下Grid內容包括四個Image元件,每個Image元件都使用同一張.png圖檔,其大小為200 x 200,Image元件各別秀出100 x 100的左上、右上、左下、右下四個部份。


<Grid x:Name="LayoutRoot" Background="Gray" Width="205" Height="205">
 <Image x:Name="img_TL" Stretch="None" Source="Orz.png">
  <Image.RenderTransform>
   <TranslateTransform X="-2.5" Y="-2.5"/>
  </Image.RenderTransform>
  <Image.Clip>
  <RectangleGeometry Rect="0,0,100,100" />
  </Image.Clip>
 </Image>      
 <Image x:Name="img_TR" Stretch="None" Source="Orz.png">
  <Image.RenderTransform>
   <TranslateTransform X="2.5" Y="-2.5"/>
  </Image.RenderTransform>
  <Image.Clip>
   <RectangleGeometry Rect="100,0,100,100" />
  </Image.Clip>
 </Image>
 <Image x:Name="img_BL" Stretch="None" Source="Orz.png" >
  <Image.RenderTransform>
   <TranslateTransform X="2.5" Y="2.5"/>
  </Image.RenderTransform>
  <Image.Clip>
   <RectangleGeometry Rect="100,100,100,100" />
  </Image.Clip>
 </Image>      
 <Image x:Name="img_BR" Stretch="None" Source="Orz.png" >
  <Image.RenderTransform>
   <TranslateTransform X="-2.5" Y="2.5"/>
  </Image.RenderTransform>
  <Image.Clip>
   <RectangleGeometry Rect="0,100,100,100" />
  </Image.Clip>
 /Image>
</Grid>

執行結果

其中<RectangleGeometry Rect="startX,startY,W,H" />指定的數值內容為「X軸起始位置,Y軸起始位置,X方向顯示寬度,Y方向顯示寬度」。

Silverlight:Image U,V  -- Part 1

一般來說的「取U、V」軸,指的是說取圖片上某一範圍。例如橫軸取 0~0.5、縱軸取0~0.5,相當於顯示圖片左上角四分之一。在Silverlight上可以使用 Clip 來完成取U、V軸的動作。
另一方面,在自動調整內容大小,由最簡單的地方開始,指定某單位數量的"*"至Colunm或Row的寬高上,Silverlight內容即可依瀏覽器大小自動調整。

將以下程式碼寫入UserControl:

<Grid x:Name="LayoutRoot" Background="Gray"
  MouseLeftButtonUp="onRectUp" MouseLeave="onLeave">
 <Rectangle Stroke="Black" StrokeThickness="5"/>
 <Grid ShowGridLines="True">
  <Grid.ColumnDefinitions>
  <ColumnDefinition Width="1*"/>
  <ColumnDefinition Width="5*" MinWidth="200"/>
  <ColumnDefinition Width="1*"/>
 </Grid.ColumnDefinitions>
 <Grid.RowDefinitions>
  <RowDefinition Height="1*"/>
  <RowDefinition Height="5*" MinHeight="200"/>
  <RowDefinition Height="1*"/>
 </Grid.RowDefinitions>
 <Image x:Name="img" Stretch="Uniform" Source="Orz.png" Grid.Column="1"
   Grid.Row="1">
   <Image.Clip>
    <RectangleGeometry Rect="0,0,200,200" x:Name="clipArea"/>
   </Image.Clip>

  </Image>
 <Image x:Name="img_grid_bg" Stretch="Uniform" Opacity="0.001"
   Source="Orz.png" Grid.Column="1" Grid.Row="1"
   MouseLeftButtonDown="onDown" MouseMove="onMove" />
 </Grid>
</Grid>

接著在 .cs檔中加入EventHandler內容:

//全域--用於記錄滑鼠左鍵是否在圖片上被按下
bool mouseClickDown = false;

滑鼠左鍵在圖片上按下時:

private void onDown(object sender, MouseButtonEventArgs e)
{
 mouseClickDown = true;
 Point pos = e.GetPosition(img);
 clipArea.Rect = new Rect(0, 0, pos.X, pos.Y);
}

滑鼠在圖片上移動時:

private void onMove(object sender, MouseEventArgs e)
{
 if (!mouseClickDown) return;
 Point pos = e.GetPosition(img);
 clipArea.Rect = new Rect(0, 0, pos.X, pos.Y);
}

當滑鼠離開、滑鼠左鍵放開時:

private void onLeave(object sender, MouseEventArgs e)
{
 mouseClickDown = false;
}
private void onRectUp(object sender, MouseButtonEventArgs e)
{
 mouseClickDown = false;
}


1.其中對Image.clip元件給定一個名字(在此即clipArea),再從程式內部來對它指定新的Clip範圍,至於想要取多少的U、V,再依個人需求去做計算。
2.在.xmal中,給了兩個Image元件,其中一個主要用來觸發滑鼠事件,而另一個負責顯示U、V的效果,而U、V的範圍主要對「clipArea」指定數值來決定。

2010年1月12日 星期二

AppEngine :指定預設頁面

到專案中開打開 Web.xml


在檔案內容可以找到

<!-- Default page to serve -->
  <welcome-file-list>
    <welcome-file> xxxxx.html</welcome-file>
  </welcome-file-list>


其中「xxxxx.html」代表的即是預設載入的頁面。