2012年2月21日 星期二
uBuntu:ADB使用方式
一、前言:
(一)、64位元的uBuntu,先「sudo apt-get install ia32-libs」(uBuntu記得連上網路嘿)
安裝完成後,系統才能夠執行 adb。
(二)、adb取得請先參考本篇
二、常用指令:
(一)、接上Android裝置後,可使用以下Combo技做為連結裝置的SOP:
1、./adb kill-server
2、sudo ./adb start-server (PS.sudo通常會要求輸入密碼)
3、adb devices
(二)、簡化指令方式:
1、若覺得鍵入「./adb」太麻煩時,可使用「Alias」來簡化指令。
2、簡化「./adb」或「./[PATH]/adb」的方式如下
(1)到Home/[使用者]/之下,[Ctrl]+[H],顯示隱藏檔。
(2)找到[.brash]檔案,以gedit編輯。
(3)加入「Alias adb=./[PATH]/adb」
(如果adb是置於使用者根目錄→「Alias adb=./Home/[使用者]/adb」。
(三)、adb其他常用指令:
1、進入裝置 : adb shell
進入後,提示將變為「#」
2、輸入檔案 : adb push [資料夾|檔案] [目標資料夾]
3、安裝軟體 : adb install -r [檔案名稱].apk
4、解除安斷 : adb uninstall [apk package名稱]
若找不到apk的package名稱時,可使用解壓縮軟體開啟apk檔案
在apk檔案裡能找到AndroidManifest.xml,想辦法找到package字樣
在package字樣後能找到一串如「com.xxx.ooo.xxx」字樣
上述字樣即為package名稱
5、查看程序 : adb jdwp
6、叫救命 : adb --help
(四)、較不常用的adb指令請「叫救命」。
(五)、adb shell內指令
1、開啟程式 :
adb shell am start -n [apk的package名稱]/[apk的package名稱].[Activity名稱]
若不知道程序名,同樣於AndroidManifest.xml裡,找到「Activity」字樣
通常在「Activity」字樣後能找到儲如「com.xxx.yyy.zzz」之類的字樣
2、輸入按鍵 : adb shell input keyevent [KEY ID]
例如,想要「解鎖」就鍵入「adb shell input keyevent 82」
00 -> "KEYCODE_UNKNOWN"
01 -> "KEYCODE_MENU"
02 -> "KEYCODE_SOFT_RIGHT"
03 -> "KEYCODE_HOME"
04 -> "KEYCODE_BACK"
05 -> "KEYCODE_CALL"
06 -> "KEYCODE_ENDCALL"
07 -> "KEYCODE_0"
16 -> "KEYCODE_9"
17 -> "KEYCODE_STAR"
18 -> "KEYCODE_POUND"
19 -> "KEYCODE_DPAD_UP"
20 -> "KEYCODE_DPAD_DOWN"
21 -> "KEYCODE_DPAD_LEFT"
22 -> "KEYCODE_DPAD_RIGHT"
23 -> "KEYCODE_DPAD_CENTER"
24 -> "KEYCODE_VOLUME_UP"
25 -> "KEYCODE_VOLUME_DOWN"
26 -> "KEYCODE_POWER"
27 -> "KEYCODE_CAMERA"
28 -> "KEYCODE_CLEAR"
29 -> "KEYCODE_A"
54 -> "KEYCODE_Z"
55 -> "KEYCODE_COMMA"
56 -> "KEYCODE_PERIOD"
57 -> "KEYCODE_ALT_LEFT"
58 -> "KEYCODE_ALT_RIGHT"
59 -> "KEYCODE_SHIFT_LEFT"
60 -> "KEYCODE_SHIFT_RIGHT"
61 -> "KEYCODE_TAB"
62 -> "KEYCODE_SPACE"
63 -> "KEYCODE_SYM"
64 -> "KEYCODE_EXPLORER"
65 -> "KEYCODE_ENVELOPE"
66 -> "KEYCODE_ENTER"
67 -> "KEYCODE_DEL"
68 -> "KEYCODE_GRAVE"
69 -> "KEYCODE_MINUS"
70 -> "KEYCODE_EQUALS"
71 -> "KEYCODE_LEFT_BRACKET"
72 -> "KEYCODE_RIGHT_BRACKET"
73 -> "KEYCODE_BACKSLASH"
74 -> "KEYCODE_SEMICOLON"
75 -> "KEYCODE_APOSTROPHE"
76 -> "KEYCODE_SLASH"
77 -> "KEYCODE_AT"
78 -> "KEYCODE_NUM"
79 -> "KEYCODE_HEADSETHOOK"
80 -> "KEYCODE_FOCUS"
81 -> "KEYCODE_PLUS"
82 -> "KEYCODE_MENU"
83 -> "KEYCODE_NOTIFICATION"
84 -> "KEYCODE_SEARCH"
85 -> "TAG_LAST_KEYCODE"
3、停止程序 : adb shell kill 程序ID
先以「adb jdwp」列出android裝置執行中的程序,再以「adb shell kill 程序」停止
4、停止系統 : adb shell stop

2012年2月6日 星期一
Eclipse:No resource found that matches the given name (...)
一、在Eclipse的專案中,在 res/layout/main.xml中記錄一些元件
二、但若某些資源沒要先做”宣告”的動作
即會出現「No resource found that matches the given name (...) 」,如:
「<string name="str_1"> STRING </string> 」即可解決錯誤。
二、但若某些資源沒要先做”宣告”的動作
即會出現「
<TextView
  android:id="@+id/MyText"
  android:layout_width="wrap_content"
  android:layout_height="wrap_content"
  android:text="@string/str_1"
  android:layout_x="61px"
  android:layout_y="69px"
  >
<TextView>
三、在res/values/strings.xml中加入「
2012年1月31日 星期二
Android + Prime Sense:Import Prime Sense Sample On uBuntu
1、前情提要:
(1)、已能夠在uBuntu下使用Eclipse之Indigo版本。
(2)、Eclipse已經能夠用來開發Android。
(3)、取得Linux version - Prime Sense Devkit。
2、在Linux下,Prime Sense提供的範例僅三個。在此,以Import SimpleViewer為例。
3、章節:Samples Import步驟
(1)、Import SamplesAssistant專案
.開啟Eclipse後,[File]->[New]->[Project]
.開啟一個Android Project
在New Android Project中選擇「Create project from existing source」
.至資料夾中選擇「SamplesAssistant」專案,按下[OK]
.在SamplesAssistant上按下滑鼠右鍵
至[Properties]->[Java Build Path]->[Libraries],選擇[Add External JARs...]
.至資料夾中找到OpenNI/java/下選擇org.OpenNI.jar,[OK]。
(2)、Import SimpleViewer專案
.[File]->[New]->[Project]
.New Android Project,選擇「Create project from existing source」
.至資料夾中選擇「SimpleViewer」專案,按下[OK]
.[The End]
4、幕後花絮:
(1)、若匯入專案後出現錯誤,可能性多為缺少元件(import jar error),再add jar即可。
(2)、Eclipse中,SimpleViewer需要使用到SimpleAssistant。
在預先Import SimpleAssistant後,匯入SimpleViewer即可完成import jar動作。
(3)、如果!!在新增[SimpleViewer]專案後,出現package錯誤,指定OpenNI的jar檔即可。
(1)、已能夠在uBuntu下使用Eclipse之Indigo版本。
(2)、Eclipse已經能夠用來開發Android。
(3)、取得Linux version - Prime Sense Devkit。
2、在Linux下,Prime Sense提供的範例僅三個。在此,以Import SimpleViewer為例。
3、章節:Samples Import步驟
(1)、Import SamplesAssistant專案
.開啟Eclipse後,[File]->[New]->[Project]
.開啟一個Android Project
在New Android Project中選擇「Create project from existing source」
.至
.在SamplesAssistant上按下滑鼠右鍵
至[Properties]->[Java Build Path]->[Libraries],選擇[Add External JARs...]
.至
(2)、Import SimpleViewer專案
.[File]->[New]->[Project]
.New Android Project,選擇「Create project from existing source」
.至
.[The End]
4、幕後花絮:
(1)、若匯入專案後出現錯誤,可能性多為缺少元件(import jar error),再add jar即可。
(2)、Eclipse中,SimpleViewer需要使用到SimpleAssistant。
在預先Import SimpleAssistant後,匯入SimpleViewer即可完成import jar動作。
(3)、如果!!在新增[SimpleViewer]專案後,出現package錯誤,指定OpenNI的jar檔即可。
2012年1月29日 星期日
Eclipse + Android API:Import Old Android Sample
新加入一個「較舊的」Android專案時,若「找不到」適用的Android API版本時,可以下述步驟加入專案:
1、File -> New -> Project... 。
2、到Android下選擇 Android Project後[Next]。
3、在「New Android Project」,請選「Create project from existing source」
選擇後,在「Location:」指定你所想要加入的「舊Android專案」,再[Next]。
4、若Eclipse中,Android API有多個版本,選擇想要使用的版本即可,[Next]。
5、[Finish]。
1、File -> New -> Project... 。
2、到Android下選擇 Android Project後[Next]。
3、在「New Android Project」,請選「Create project from existing source」
選擇後,在「Location:」指定你所想要加入的「舊Android專案」,再[Next]。
4、若Eclipse中,Android API有多個版本,選擇想要使用的版本即可,[Next]。
5、[Finish]。
2012年1月26日 星期四
ubuntu下建立Android開發環境(一)
一、開發Android應用程式,在此以(Eclipse + Android SDK)* uBuntu 為主。
二、具備下例條件時,建議就用ubuntu來開發Android:
(一)、不懂怎麼從Windows之下連入Android裝置。(ubuntu下連結Android裝置簡單多了)
(二)、Windows下使用Eclipse啟動Android模擬器時,模擬器極其遲鈍。
(三)、稍懂得怎麼使用 adb 指令及linux指令。
三、簡述步驟:
(一)、安裝Java SDK For Linux(下載頁面)
(二)、Android SDK installer,安裝後可隨時下載各版本Android API(下載頁面)
(三)、Eclipse IDE For Java EE Develop (Indigo On Linux下載頁面)
(四)、可下、可不下:ADT(Android Development Tools ADT 設定頁面)
四、請記得,ubuntu要更新,若為64位元系統時,則必要安裝ia32-libs元件(ubuntu指令:$ sudo apt-get install ia32-libs)。
五、使用adb前,下載Android SDK後,可在/platform-tools/下找到 adb(參考頁面)
六、有點ubuntu及eclipse使用經驗的,下載完後,應該能將Android開發環境建立完成,沒經驗的...詳細步驟我再找時間寫~XD
二、具備下例條件時,建議就用ubuntu來開發Android:
(一)、不懂怎麼從Windows之下連入Android裝置。(ubuntu下連結Android裝置簡單多了)
(二)、Windows下使用Eclipse啟動Android模擬器時,模擬器極其遲鈍。
(三)、稍懂得怎麼使用 adb 指令及linux指令。
三、簡述步驟:
(一)、安裝Java SDK For Linux(下載頁面)
(二)、Android SDK installer,安裝後可隨時下載各版本Android API(下載頁面)
(三)、Eclipse IDE For Java EE Develop (Indigo On Linux下載頁面)
(四)、可下、可不下:ADT(Android Development Tools ADT 設定頁面)
四、請記得,ubuntu要更新,若為64位元系統時,則必要安裝ia32-libs元件(ubuntu指令:$ sudo apt-get install ia32-libs)。
五、使用adb前,下載Android SDK後,可在
六、有點ubuntu及eclipse使用經驗的,下載完後,應該能將Android開發環境建立完成,沒經驗的...詳細步驟我再找時間寫~XD
2011年12月6日 星期二
怪C# process start exe 的 Win7 權限不足?
以C#執行程式本身以外的執行檔時,若屬於登錄檔(regedit)裡找的到的檔案(如 notepad.exe、word檔等等),都能執行成功。
但若一個執行檔,在「所在地範圍外」執行,就出問題了。
執行程式本身以外的執行檔(exe),步驟如下:
1、老方法,以process來執行額外程序(using System.Diagnostics 先)。
2、加入以下程式碼
"所在資料夾" ;」。若少了這一個動作,執行檔常常會無法正常執行。
但若一個執行檔,在「所在地範圍外」執行,就出問題了。
執行程式本身以外的執行檔(exe),步驟如下:
1、老方法,以process來執行額外程序(using System.Diagnostics 先)。
2、加入以下程式碼
Process _exe = new Process();
_exe.StartInfo.FileName = "路徑" ;
_exe.StartInfo.WorkingDirectory = "所在資料夾" ;
_exe.Start();
3、這裡的重點在於「_exe.StartInfo.WorkingDirectory = 2011年8月3日 星期三
簡述Prime Sense API
1、Prime Sense 以「OpenNI」為基礎建立「NITE」,再以「NITE」提供3D Gesture及其他應用。
2、NITE提供「hand tracking」、「user detector」、「depth detector」、「3d gestures detector」
2、Prime Sense Camera同於Kinet所使用的Camera,雖同以「OpenNI」為基礎,卻各自擁有不同的SDK。
3、NITE內的演算法以處理「hand tracking」為重點(人體骨架的使用仍需交給OpenNI處理)。
4、不同於Kinet,NITE的使用者需要做特定動作啟動程式(Initial Pose)。
5、NITE的「初始化手勢」有兩種,分別為「Wave」及「Click」。
API要角:
各種Detector,如 Wave Detector專門負責偵測使用者是否做了「Wave」,當使用者有需求時,將「WaveDetecotr」加入程式,再以callback取得wave偵測。NITE提供的 Detector包括「Wave」、「Circle」、「Swipe」、「Steady」、「Push」。
相當於「總管」、「掌門」、「開關」的角色,決定偵測及偵測內容之執行。
相當方便的應用元件,包括「SelectableSlider1D」及「SelectableSlider2D」,能對Camera所偵測畫面做區域分割。
若一次只想偵測一種手勢時,請使用此元件。
為「Flow Router」的進階,將想要偵測的手勢加入Broadcaster,即可同時偵測多項手勢。
NITE執行概念:
Step1:宣告「 Session Manager」元件
Step2:宣告欲使用的「Detector」及其「callbacks」
Step3:宣告「Flow Router」或「Broadcast」
Step4:將Detector加入「Flow Router」或「Broadcast」
Step5:將「Flow Router」或「Broadcast」加入「Session Manager」
Step6:宣告一Thread,以無限迴圈的方式執行 Session Manager內容,取得Camera內容並更新偵測內容。
以上,即可運用Prime Sense Camera配合程式碼完成3D操作的動作!
2011年7月31日 星期日
Gesture + Skeleton :最近的玩具 - Kung Fu Live & 其他
突然想起來...偉德說:「玩過的玩具該多做點紀錄」~XD
好玩有趣的其中之一:
Game : Kung Fu live參考影片(ref:http://www.kungfulivegame.com/videos/)
這個遊戲需要用Prime Sense 3D Camera來玩。事實上網路上已有非常多的相關影片,這裡貼的是他們自己的廣告影片(真該給他們一個讚)
KungFu Live是從PS3移至PC的Skelecton Game,雖然只有短短10關,但遊戲內容很有創意。目前為止,讓人最為印象深刻的Skeleton Game就屬它了!!
後續若有閒,再慢慢補上:
1、Prime Sense相關應用技術
(1)、Prime Sense API & 使用前請先搖一搖
(2)、如何讓Prime Sense 3D Camera正常動起來
2、最近生出來的 「Gesture TV」
(1)、Q:關於未來電視的搖控器,你覺得會長什麼樣子?
3、3D Max 入門
(1)、創造自己的的3D世界,簡單~(3D Max是比「最近」再更早以前習得的額外技能)
4、Virtools 進階
(1)、此軟體的臺灣代理商叫「愛迪斯科技」,簡單好用...雖然不太流行><"
(2)、除了「移植性爛到3個標準差之外」的缺點,建立3D互動的世界工具中,它真的很讚
5、3D Max + Virtools = 3D Games
(1)、一個人就能創造自己的3D遊戲!!
(2)、若想玩的更深入,那就把Prime Sense也加進來
有空寫完這些嗎?~XD 看工作時有沒有其他多餘時間........
好玩有趣的其中之一:
這個遊戲需要用Prime Sense 3D Camera來玩。事實上網路上已有非常多的相關影片,這裡貼的是他們自己的廣告影片(真該給他們一個讚)
KungFu Live是從PS3移至PC的Skelecton Game,雖然只有短短10關,但遊戲內容很有創意。目前為止,讓人最為印象深刻的Skeleton Game就屬它了!!
後續若有閒,再慢慢補上:
1、Prime Sense相關應用技術
(1)、Prime Sense API & 使用前請先搖一搖
(2)、如何讓Prime Sense 3D Camera正常動起來
2、最近生出來的 「Gesture TV」
(1)、Q:關於未來電視的搖控器,你覺得會長什麼樣子?
3、3D Max 入門
(1)、創造自己的的3D世界,簡單~(3D Max是比「最近」再更早以前習得的額外技能)
4、Virtools 進階
(1)、此軟體的臺灣代理商叫「愛迪斯科技」,簡單好用...雖然不太流行><"
(2)、除了「移植性爛到3個標準差之外」的缺點,建立3D互動的世界工具中,它真的很讚
5、3D Max + Virtools = 3D Games
(1)、一個人就能創造自己的3D遊戲!!
(2)、若想玩的更深入,那就把Prime Sense也加進來
有空寫完這些嗎?~XD 看工作時有沒有其他多餘時間........
2010年5月7日 星期五
WPF : Translate & Rotate
以Grid來舉例,在Grid.RenderTransform時,先做「TranslateTransform」或是先做「RotateTransform」是有差別的:
確實以(0,0)點做Rotate,意即先Rotate再做Translate:
反之,將Translate放在Rotate之前,會先做Translate,再以(0,0)點做Rotate
確實以(0,0)點做Rotate,意即先Rotate再做Translate:
<Grid.RenderTransform>
 <TransformGroup>
  <RotateTransform CenterX="0" CenterY="0" Angle="0"
    x:Name="Crash_MidFront_Rotate"/>
  <TranslateTransform X="560" Y="300"/>
 </TransformGroup>
</Grid.RenderTransform>
反之,將Translate放在Rotate之前,會先做Translate,再以(0,0)點做Rotate
2010年4月14日 星期三
Silverlight : Point Animation of Storyboard
運用Path元件中 LineSegment來製造3D的假像,以下紀錄對於LineSegment中 Point動畫的設定:
其中一個Path元件的內容如下:
假若Target直接指定Path元件,則TargetProperty設定值為:
可做到的效果(按下box前端及右端做上下拖拽):Box
<Storyboard x:Name="BoxSide_LeftSide_Back" Duration="0:0:1" >
 <PointAnimation x:Name="PointMove_Left_TL"
  Storyboard.TargetName="BoxSide_LeftSide_TL"
  Storyboard.TargetProperty="(LineSegment.StartPoint)"
  From="0,0" To="0,0"/>
 <PointAnimation x:Name="PointMove_Left_TR"
  Storyboard.TargetName="BoxSide_LeftSide_TR"
  Storyboard.TargetProperty="(LineSegment.Point)"
  From="0,0" To="0,0"/>

 <PointAnimation x:Name="PointMove_Left_BL"
  Storyboard.TargetName="BoxSide_LeftSide_BL"
  Storyboard.TargetProperty="(LineSegment.Point)"
  From="0,0" To="0,0"/>
 <PointAnimation x:Name="PointMove_Left_BR"
  Storyboard.TargetName="BoxSide_LeftSide_BR"
  Storyboard.TargetProperty="(LineSegment.Point)"
  From="0,0" To="0,0"/>
</Storyboard>
其中一個Path元件的內容如下:
<Path  x:Name="BoxSide_BackSide" Stroke="Gold">
 <Path.RenderTransform>
  <TranslateTransform X="200" Y="0"/>
 </Path.RenderTransform>
 <Path.Fill>
  <LinearGradientBrush StartPoint="0,0" EndPoint="0,1" >
   <GradientStop Color="#FF770000" Offset="0.0"/>
   <GradientStop Color="Black" Offset="1.0"/>
  </LinearGradientBrush>
 </Path.Fill>
 <Path.Data>
  <PathGeometry >
   <PathFigure StartPoint="90,100" IsClosed="True"
    x:Name="BoxSide_BackSide_TL">
    <LineSegment Point="310,100" x:Name="BoxSide_BackSide_TR"/>
    <LineSegment Point="300,150" x:Name="BoxSide_BackSide_BR"/>
    <LineSegment Point="100,150" x:Name="BoxSide_BackSide_BL"/>
   </PathFigure>
  </PathGeometry>
 </Path.Data>
</Path>
假若Target直接指定Path元件,則TargetProperty設定值為:
Storyboard.TargetProperty=
 "(Path.Data).(PathGeometry.Figures)[0].
 (PathFigure.Segments)[0].(LineSegment.Point)"
可做到的效果(按下box前端及右端做上下拖拽):Box
2010年3月18日 星期四
C#:Dynamic Array
適用於 .NET 2.0 以上
無法確定陣列長度,要動態存取Grid陣列時:
加入物件:
取得物件,假設想要取得第一萬兩千三百四十五個Grid:
參考頁:http://forums.asp.net/p/1188478/2036031.aspx#2036031
無法確定陣列長度,要動態存取Grid陣列時:
List<Grid> dynamicGrid = new List<Grid>();
加入物件:
Grid myGrid = new Grid();
dynamicGrid.Add(myGrid)
取得物件,假設想要取得第一萬兩千三百四十五個Grid:
Grid tmpGrid = dynamicGrid[12345];
參考頁:http://forums.asp.net/p/1188478/2036031.aspx#2036031
2010年3月3日 星期三
3D Gesture:蠻有感覺的3D Gesture
參考頁:http://web.media.mit.edu/~mhirsch/bidi/
研究3D Gesture者可以參考一下,其內容為一種融合觸控及3D Gesture的LCD,其中他們同時提供paper,說明使用LCD同時達成「capture」及「display」。
Bidi Screen於YouTube的影片
研究3D Gesture者可以參考一下,其內容為一種融合觸控及3D Gesture的LCD,其中他們同時提供paper,說明使用LCD同時達成「capture」及「display」。
2010年3月1日 星期一
Silverlight、C#:Unicode轉換
在C#中可使用以下程式碼對字串轉換為Unicode或將Unicode轉換為字元:
Encode
Decode
但上述程式碼中,Decode的部份在Slilverlight會出現「... is inaccessable due to its protection level」的錯誤,請改為以下內容,程式即可正常編譯:
Decode at Silverlight
using System.Text;

private string StringToUnicode(string srcText)
{
  string dst = "";
  char[] src = srcText.ToCharArray();
  for (int i = 0; i < src.Length; i++)
  {
   byte[] bytes = Encoding.Unicode.GetBytes(src[i].ToString());
   string str = @"\u" + bytes[1].ToString("X2") + bytes[0].ToString("X2");
   dst += str;
  }
  return dst;
}
using System.Globalization;

private string UnicodeToString(string srcText)
{
string dst = "";
string src = srcText;
int len = srcText.Length / 6;

for (int i = 0; i <= len - 1; i++)
{
  string str = "";
  str = src.Substring(0, 6).Substring(2);
  src = src.Substring(6);
  byte[] bytes = new byte[2];
  bytes[1] =
   byte.Parse(int.Parse
    (str.Substring(0,2),NumberStyles.HexNumber).ToString());
  bytes[0] = byte.Parse(int.Parse
    (str.Substring(2,  2),NumberStyles.HexNumber).ToString());
  dst += Encoding.Unicode.GetString(bytes);
  }
  return dst;
}
但上述程式碼中,Decode的部份在Slilverlight會出現「... is inaccessable due to its protection level」的錯誤,請改為以下內容,程式即可正常編譯:
string UnicodeToString(string srcText)
{
string dst = "";
string src = srcText;
int len = srcText.Length / 6;
for (int i = 0; i <= len - 1; i++)
{
string str = "";
str = src.Substring(0, 6).Substring(2);
src = src.Substring(6);
byte[] bytes = new byte[2];
bytes[1] = byte.Parse(int.Parse(str.Substring(0, 2),
NumberStyles.HexNumber).ToString());
bytes[0] = byte.Parse(int.Parse(str.Substring(2, 2),
NumberStyles.HexNumber).ToString());
Encoding enc = Encoding.GetEncoding("utf-16") ;
dst += enc.GetString(bytes, 0, bytes.Length);
}
return dst;
}
2010年2月23日 星期二
HandVu:試以不同Posture做為『Start Posture』
最初HandVu在執行時,必需使用「Closed」手勢告知程式去「Start Recognize」:

這裡將嘗試使用「Vectory」手勢做為Start Recongnize手勢:

1、到config資料夾,可以找到以下檔案:
a. default.conductor
b. all_extended_0_5_10_15_closed_30x20.cascade
c. all_extended_0_5_10_15_closed_30x20.mask
d. all_hands_combined.cascade
e. victory.mask
2、請額外建立兩個檔案:
a. gestureTest.cascade
b. gestureTest.mask
3、將以上檔案(原有及新建共7個檔案)以文字檔的方式開啟,並同時將
a.「all_extended_0_5_10_15_closed_30x20.cascade 」的內容copy至「gestureTest.cascade」。
b.「victory.mask 」的內容copy至「gestureTest.mask」
4、到default.conductor (約第25行的位置)找到
將
改為
上述動作即對原本讀取「all_extended_0_5_10_15_closed_30x20.cascade」來做Start Recognize Posture改為讀取「gestureTest.cascade」為之。
同時請到default.conductor 檔案尾,將「all_extended_0_5_10_15_closed_30x20.mask」改為「gestureTest.mask 」。
5、到「gestureTest.mask 」,約第4行的位置,原先為
改為
6、到「all_hands_combined.cascade 」,由內容往下(第83行)找到:
移到下一行,從「7 strong classifiers. 」開始copy內容,直到發現下一個 「BRANCH」為止(copy至第369行)。
7、「gestureTest.cascade 」中,找到「9 strong classifiers. 」(約第4行),將此行以下的內容全數刪除,並將第6步所copy的內容由此處貼上。
8、到「gestureTest.cascade 」約第3行,原為:
ClassifierCascade "CreatTest_closed_30x20" ... ...
取代為
ClassifierCascade "start_on_victory", sequential, 25x25, ratio 0.8 (fpr:1, dr:1, successful)
以上動作完成後,啟動程式,即能夠使用「victory posture」來做為 Start posture。


1、到config資料夾,可以找到以下檔案:
a. default.conductor
b. all_extended_0_5_10_15_closed_30x20.cascade
c. all_extended_0_5_10_15_closed_30x20.mask
d. all_hands_combined.cascade
e. victory.mask
2、請額外建立兩個檔案:
a. gestureTest.cascade
b. gestureTest.mask
3、將以上檔案(原有及新建共7個檔案)以文字檔的方式開啟,並同時將
a.「
b.「
4、到
1 detection cascades
all_extended_0_5_10_15_closed_30x20.cascade
將
all_extended_0_5_10_15_closed_30x20.cascade改為
gestureTest.cascade上述動作即對原本讀取「all_extended_0_5_10_15_closed_30x20.cascade」來做Start Recognize Posture改為讀取「gestureTest.cascade」為之。
同時請到
5、到「
Mask "victory", 25x25, ratio 0.8
改為
Mask "start_on_victory", 25x25, ratio 0.86、到「
BRANCH 0 "victory" (fpr:8.48039e-21, dr:0.247505)移到下一行,從「
7、「
8、到「
ClassifierCascade "CreatTest_closed_30x20" ... ...
取代為
ClassifierCascade "start_on_victory", sequential, 25x25, ratio 0.8 (fpr:1, dr:1, successful)
以上動作完成後,啟動程式,即能夠使用「victory posture」來做為 Start posture。
2010年2月2日 星期二
HandVu:Beta3.0 Source Code
一個已暫停開發且Open Source的手勢辦識Project:HandVu
有興趣可以下載研究一下(借用Google的App Engine,上傳檔案最大只能到10Mb,這裡將OpenCV分割後提供下載,請全部下載後再一起解壓縮):
OpenCV 0.97
OpenCV0.97-001
OpenCV0.97-002
OpenCV0.97-003
OpenCV0.97-004
OpenCV0.97-005
OpenCV0.97-006
HandVu Beta3.0
HandVu_Beta_3-001
HandVu_Beta_3-002
HandVu_Beta_3-003
這裡使用 MS Visual Studio 2008作為開發工具,執行時請注意,自備一臺Camera(NB上的Camera就行) ,另外需注意的是您必需將以下檔案置入 WINDOWS\system32 內:
1、highgui096.dll
2、cxcore097.dll
3、cv097.dll
以上檔案到OpenCV097搜尋都能找到(下載後,解壓縮會得到OpenCV097 )。
如果你拿到了陽春的、沒有編譯過的HandVu Beta3.0檔案,大致上環境建立的步驟如下:
1、Setup OpenCV 0.97 (OpenCV : Intel® 的 Open Source Computer Vision Library),在這裡下載的OpenCV不需另外做Setup的動作。
2、編譯前別忘到 Options → Projects and Solutions → VC++ Directories 指定標頭檔及lib檔路徑(OpenCV's Library)
3、依序編譯HandVu Beta3.0內的Cublicles、HandVu、hv_OpenCV等專案(使用VS2008,自行指定需要被Include的h及lib檔案)。
4、編譯成功後,執行Release內的cmd.exe檔案,鍵入「hv_OpenCV.exe ..\..\config\default.conductor」,或者您可以製作一個 .bat檔案方便執行(將需鍵入的指命直接copy至.bat的內容即可)。
有興趣可以下載研究一下(借用Google的App Engine,上傳檔案最大只能到10Mb,這裡將OpenCV分割後提供下載,請全部下載後再一起解壓縮):
OpenCV 0.97
OpenCV0.97-001
OpenCV0.97-002
OpenCV0.97-003
OpenCV0.97-004
OpenCV0.97-005
OpenCV0.97-006
HandVu Beta3.0
HandVu_Beta_3-001
HandVu_Beta_3-002
HandVu_Beta_3-003
這裡使用 MS Visual Studio 2008作為開發工具,執行時請注意,
1、highgui096.dll
2、cxcore097.dll
3、cv097.dll
以上檔案到OpenCV097搜尋都能找到(
如果你拿到了陽春的、沒有編譯過的HandVu Beta3.0檔案,大致上環境建立的步驟如下:
1、Setup OpenCV 0.97 (OpenCV : Intel® 的 Open Source Computer Vision Library),在這裡下載的OpenCV不需另外做Setup的動作。
2、編譯前別忘到 Options → Projects and Solutions → VC++ Directories 指定標頭檔及lib檔路徑(OpenCV's Library)
3、依序編譯HandVu Beta3.0內的Cublicles、HandVu、hv_OpenCV等專案(使用VS2008,自行指定需要被Include的h及lib檔案)。
4、編譯成功後,執行Release內的cmd.exe檔案,鍵入「hv_OpenCV.exe ..\..\config\default.conductor」,或者您可以製作一個 .bat檔案方便執行(將需鍵入的指命直接copy至.bat的內容即可)。
2010年1月25日 星期一
Silverlight & Game:Puzzlies - Part 2
執行結果
下載原始檔
前一篇已將Puzzles中移動區塊的功能寫畢,接著我們加入「打散」的動作。
1.同前一篇的步驟新增一個類別,並命名為「shuffle」
using System;
using System.Net;
using System.Windows;
using System.Windows.Controls;
using System.Windows.Documents;
using System.Windows.Ink;
using System.Windows.Input;
using System.Windows.Media;
using System.Windows.Media.Animation;
using System.Windows.Shapes;

namespace ImageClip_Puzzles
{
 public class shuffle
 {
  Random r = new Random();
  public void randomMove(
   imageBox[] ibArray,int[,] posArr,int count,
   int imageSize,int gridWidth){
  for (int i = 0; i < count; i++)
  {
   int moveValue = addMove();
   int moveIndex = 0;
   if (r.Next(0, 2) == 0)//do x
   {
    if (moveValue < 0) // '-'
    {
     if (ibArray[0].colIndex <= 0)
     {
       moveIndex = posArr[ibArray[0].rowIndex,
       ibArray[0].colIndex + 1];
       posArr[ibArray[0].rowIndex,
           ibArray[0].colIndex + 1] = 0;
       posArr[ibArray[0].rowIndex,
           ibArray[0].colIndex] = moveIndex;
     }
     else
     {
      moveIndex = posArr[ibArray[0].rowIndex,
      ibArray[0].colIndex - 1];
      posArr[ibArray[0].rowIndex,
          ibArray[0].colIndex - 1] = 0;
      posArr[ibArray[0].rowIndex,
          ibArray[0].colIndex] = moveIndex;
     }
    }
    else // '+'
    {
     if (ibArray[0].colIndex >= (gridWidth - 1))
     {
      moveIndex = posArr[ibArray[0].rowIndex,
                ibArray[0].colIndex - 1];
      posArr[ibArray[0].rowIndex,
          ibArray[0].colIndex - 1] = 0;
      posArr[ibArray[0].rowIndex,
          ibArray[0].colIndex] = moveIndex;
     }
     else
     {
      moveIndex = posArr[ibArray[0].rowIndex,
                ibArray[0].colIndex + 1];
      posArr[ibArray[0].rowIndex,
          ibArray[0].colIndex + 1] = 0;
      posArr[ibArray[0].rowIndex,
          ibArray[0].colIndex] = moveIndex;
     }
    }
   }
   else // do y
   {
    if (moveValue < 0) // '-1' = 'down'
    {
     if (ibArray[0].rowIndex <= 0) // move down (r+)
     {
      moveIndex =
       posArr[ibArray[0].rowIndex + 1, ibArray[0].colIndex];
      posArr[ibArray[0].rowIndex + 1,
          ibArray[0].colIndex] = 0;
      posArr[ibArray[0].rowIndex,
          ibArray[0].colIndex] = moveIndex;
     }
     else // move up (r-)
     {
      moveIndex =
       posArr[ibArray[0].rowIndex - 1, ibArray[0].colIndex];
      posArr[ibArray[0].rowIndex - 1,
          ibArray[0].colIndex] = 0;
      posArr[ibArray[0].rowIndex,
          ibArray[0].colIndex] = moveIndex;
     }
    }
    else // '1' = 'up'
    {
     if (ibArray[0].rowIndex >= (gridWidth - 1))
     {
      moveIndex =
       posArr[ibArray[0].rowIndex - 1, ibArray[0].colIndex];
      posArr[ibArray[0].rowIndex - 1,
          ibArray[0].colIndex] = 0;
      posArr[ibArray[0].rowIndex,
          ibArray[0].colIndex] = moveIndex;
     }
     else
     {
      moveIndex =
       posArr[ibArray[0].rowIndex + 1, ibArray[0].colIndex];
      posArr[ibArray[0].rowIndex + 1,
          ibArray[0].colIndex] = 0;
      posArr[ibArray[0].rowIndex,
          ibArray[0].colIndex] = moveIndex;
     }
    }
   }
   int tmpColIndex = ibArray[moveIndex].colIndex;
   int tmpRowIndex = ibArray[moveIndex].rowIndex;
   ibArray[moveIndex].moveToDirectly(
             ibArray[0].rowIndex - tmpRowIndex,
             ibArray[0].colIndex - tmpColIndex);
   ibArray[0].moveToDirectly(
             tmpRowIndex - ibArray[0].rowIndex,
             tmpColIndex - ibArray[0].colIndex);
   }
  }
  public int addMove()
  {
   if (r.Next(0, 2) == 0)// '+'
   {
    return 1;
   }
   else // '-'
   {
    return -1;
   }
  }
 }
}
除了打散圖片區塊會使用到的.cs檔以外,我還需要在原本的程式中插入幾個Function:
1.加入全域變數int[,] imagePos。
2.新增shuffle物件。
 int[,] imagePos;//use in postion record
 shuffle shu = new shuffle();
3.在 loadImg(),Function最尾端加入以下程式內容:
shu.randomMove(IBArray, imagePos, 50, imageSize, gridNum);
a.在程式執行前先建立了一個名為shu的shuffle物件。
b.程式將圖片區塊建立結束後,使用shuffle物件打散圖片區塊的位置。
c. 參數: randomMove(圖片區塊陣列,當前圖片區塊位置,圖片打散移動次數,圖片圖素大小,寬度)
2010年1月20日 星期三
Silverlight & Game:Puzzlies - Part 1
寫個Puzzlies小遊戲吧!
遊戲內容非常單純,移動3 x 3或 N x N的圖片區塊,恢復為完整的圖即成功。
本篇內容,先建立Puzzles的骨架及基本動作,其中我們一共會建立兩個 .xaml檔及一個.cs檔,另外需匯入一張圖片,檔案名稱如下:
a. MainPage.xaml
b. imageBox.xaml
c. myRecorder.cs
d. 圖片:imgs/Orz.png
1.建立一個新的Silverlight Applciation專案,在這裡我將專案名稱命為「ImageClip_Puzzlies」 ,以下為完整MainPage.xaml內容:
2.接著是imageBox.xaml 的內容:
3.別忘了 mainPage.xaml 及imageBox.xaml 的 .cs內容:
mainPage.xaml
imageBox.xaml
4.最後是 myRecorder.cs 的內容:
先前已有介紹如何在Silverlight元件裡額外加入一個屬性,「myRecorder.cs」的內容即新增的屬性的Class。
就本篇內容來說,遊戲時「圖片區塊的移動」的動作已寫好。此外為了除蟲方便,程式中加入了「SysMsg」Function,執行時我們能夠簡單看到目前圖片位置的屬性值。
執行結果
遊戲內容非常單純,移動3 x 3或 N x N的圖片區塊,恢復為完整的圖即成功。
本篇內容,先建立Puzzles的骨架及基本動作,其中我們一共會建立兩個 .xaml檔及一個.cs檔,另外需匯入一張圖片,檔案名稱如下:
a. MainPage.xaml
b. imageBox.xaml
c. myRecorder.cs
d. 圖片:imgs/Orz.png
1.建立一個新的Silverlight Applciation專案,在這裡我將專案名稱命為
<UserControl x:Class="ImageClip_Puzzles.MainPage"
 xmlns="http://schemas.microsoft.com/winfx/2006/xaml/presentation"
 xmlns:x="http://schemas.microsoft.com/winfx/2006/xaml"
 xmlns:d="http://schemas.microsoft.com/expression/blend/2008"
 xmlns:mc="http://schemas.openxmlformats.org/markup-compatibility/2006"
 mc:Ignorable="d" d:DesignWidth="640" d:DesignHeight="480" Loaded="loadImg">
 <Grid  Background="Gray" Width="500" Height="500"
    VerticalAlignment="Center" HorizontalAlignment="Center" >
  <Grid x:Name="PuzzlesTop" >
   <Grid.ColumnDefinitions>
    <ColumnDefinition Width="10"/>
    <ColumnDefinition Width="*"/>
    <ColumnDefinition Width="10"/>
  </Grid.ColumnDefinitions>
  <Grid.RowDefinitions>
   <RowDefinition Height="10"/>
   <RowDefinition Height="*"/>
   <RowDefinition Height="10"/>
  </Grid.RowDefinitions>
   <Grid Grid.Column="1" Grid.Row="1">
    <Rectangle Fill="Black"/>
   </Grid>
  </Grid>
  <TextBlock Text="sys" x:Name="sysMsg" FontSize="12"
      VerticalAlignment="Top" HorizontalAlignment="Center">
   <TextBlock.RenderTransform>
    <TranslateTransform X="0" Y="-20"/>
   </TextBlock.RenderTransform>
  </TextBlock>
 </Grid>
</UserControl>
2.接著是
<UserControl x:Class="ImageClip_Puzzles.imageBox"
 xmlns="http://schemas.microsoft.com/winfx/2006/xaml/presentation"
 xmlns:x="http://schemas.microsoft.com/winfx/2006/xaml"

 Width="Auto" Height="Auto" x:Name="imageTop"  >
 <Canvas Height="600" Width="600" x:Name="imageCanvas">
  <Canvas.Resources>
   <Storyboard x:Name="moveImage_Direct_Up" SpeedRatio="5">
    <DoubleAnimation x:Name="UpAnima"
     Storyboard.TargetName="imageGrid"
     Storyboard.TargetProperty="(Canvas.Top)"
     From="0" To="0" Duration="0:0:1"  AutoReverse="False"/>
    <DoubleAnimation x:Name="borderAnima_Up"
     Storyboard.TargetName="imageBorder"
     Storyboard.TargetProperty="(Border.RenderTransform).Y"
     From="0" To="0" Duration="0:0:1" AutoReverse="False"/>
   </Storyboard>
   <Storyboard x:Name="moveImage_Direct_Left" SpeedRatio="5">
    <DoubleAnimation x:Name="LeftAnima"
     Storyboard.TargetName="imageGrid"
     Storyboard.TargetProperty="(Canvas.Left)"
     From="0" To="0" Duration="0:0:1"  AutoReverse="False"/>

    <DoubleAnimation x:Name="borderAnima_Left"
     Storyboard.TargetName="imageBorder"
     Storyboard.TargetProperty="(Border.RenderTransform).X"
     From="0" To="0" Duration="0:0:1" AutoReverse="False"/>
   </Storyboard>
  </Canvas.Resources>
  <Grid Canvas.Top="0" Canvas.Left="0"
   Width="480" Height="480" x:Name="imageGrid" >
   <Image Source="imgs/Orz.png" Stretch="Fill" x:Name="imageContent">
    <Image.Clip>
     <RectangleGeometry Rect="0,0,160,160 " >
     <RectangleGeometry.Transform>
      <TranslateTransform X="0" Y="0" x:Name="ImageAreaTransform"/>
     </RectangleGeometry.Transform>
     </RectangleGeometry>
    </Image.Clip>
   </Image>
  </Grid>
  <Border BorderBrush="#FF666666" BorderThickness="5" x:Name="imageBorder">
   <Border.RenderTransform>
    <TranslateTransform X="0" Y="0" x:Name="boardPosition"/>
   </Border.RenderTransform>
   <Rectangle x:Name="imageColor"
    Width="155" Height="155" Fill="Red" Opacity="0.01"/>
  </Border>
  <Grid Visibility="Visible">
   <Grid.RenderTransform>
    <TranslateTransform X="5" Y="10" x:Name="msgPos"/>
   </Grid.RenderTransform>
   <Grid.RowDefinitions>

    <RowDefinition Height="14"/>
    <RowDefinition Height="14"/>
    <RowDefinition Height="14"/>
    <RowDefinition Height="14"/>
    <RowDefinition Height="14"/>
   </Grid.RowDefinitions>
   <TextBlock x:Name="imgSysMsg1" Text="" FontSize="12" Grid.Row="0"/>
   <TextBlock x:Name="imgSysMsg2" Text="" FontSize="12" Grid.Row="1"/>
   <TextBlock x:Name="imgSysMsg3" Text="" FontSize="12" Grid.Row="2"/>
   <TextBlock x:Name="imgSysMsg4" Text="" FontSize="12" Grid.Row="3"/>
   <TextBlock x:Name="imgSysMsg5" Text="" FontSize="12" Grid.Row="4"/>
  </Grid>
 </Canvas>
</UserControl>
3.別忘了
using System;
using System.Collections.Generic;
using System.Linq;
using System.Net;
using System.Windows;
using System.Windows.Controls;
using System.Windows.Documents;
using System.Windows.Input;
using System.Windows.Media;
using System.Windows.Media.Animation;
using System.Windows.Shapes;

namespace ImageClip_Puzzles
{
 public partial class MainPage : UserControl
 {
  private void SysMsg(string msg)
  {
   sysMsg.Text = msg;
  }
  int gridNum = 3;
  int imageSize = 160;
  Point[,] imagePos;
  imageBox[] IBArray;

  public MainPage()
  {
   InitializeComponent();
  }
  private void loadImg(object sender, RoutedEventArgs e)
  {
   imagePos = new Point[gridNum, gridNum];
   IBArray = new imageBox[gridNum * gridNum];
   for (int i = 0; i < gridNum; i++)
   {
    for (int j = 0; j < gridNum; j++)
    {
     imageBox ib = new imageBox();
     int indexOfAll = i * gridNum + j;
     IBArray[indexOfAll] = ib;

     ib.MouseLeftButtonDown += onImageClick;
     ib.moveImage_Direct_Up.Completed += moveIsFinish;
     ib.moveImage_Direct_Left.Completed += moveIsFinish;

     ib.setInfo(indexOfAll,i, j, gridNum, imageSize);
     PuzzlesTop.Children.Add(ib);
     ib.setGridPosition(1, 1);
     imagePos[i, j] =
      new Point(j * imageSize, i * imageSize);
        }
      }
      BArray[0].setImageColor(0xFF, 0x00, 0x00);
    }
    bool imgIsMoving = false;
    private void onImageClick(object sender, MouseButtonEventArgs e)
    {
      SysMsg("imgIsMoving : " + imgIsMoving.ToString());
      if (imgIsMoving) return;
      imgIsMoving = true;
      imageBox uc = sender as imageBox;
      string dir = getPic1(IBArray[uc.indexOfAllIBArray].rowIndex,
                        IBArray[uc.indexOfAllIBArray].colIndex);
      uc.moveImageTo(dir);
      switch (dir)
      {
        case "up":
          IBArray[0].moveImageTo("down");
          break;
        case "down":
          IBArray[0].moveImageTo("up");
          break;
        case "left":
          IBArray[0].moveImageTo("right");
          break;
        case "right":
          IBArray[0].moveImageTo("left");
          break;
        default:
          imgIsMoving = false;
           break;
      }
    }
    private void moveIsFinish(object sender, EventArgs e)
    {
      Storyboard sb = (Storyboard)sender;
      imageBox tmpImageBox =
            (imageBox) sb.GetValue(myRecorder.record_ImageBox);
      if (tmpImageBox.indexOfAllIBArray == 0) return;
      int tmpRIndex = tmpImageBox.rowIndex;
      int tmpCIndex = tmpImageBox.colIndex;

      tmpImageBox.resetCurrentPosition(IBArray[0].rowIndex,
                                    IBArray[0].colIndex);
      IBArray[0].resetCurrentPosition(tmpRIndex, tmpCIndex);

      imgIsMoving = false;
    }
    private string getPic1(int r, int c)
    {
      if (((r - 1) == IBArray[0].rowIndex)
      && (c == IBArray[0].colIndex))
      // at down of Pic0 - - -> (r-1,c) then the imagemove 'up'
      {
        return "up";
      }
      else if (((r + 1) == IBArray[0].rowIndex)
           && (c == IBArray[0].colIndex))
      //at top of Pic0 - - -> (r+1,c) then the image move 'down'
      {
        return "down";
      }
      else if ((r == IBArray[0].rowIndex)
           && ((c-1) == IBArray[0].colIndex))
      //at right of Pic0 - - -> (r,c-1) then the image move 'left'
      {
        return "left";
      }
      else if ((r == IBArray[0].rowIndex)
           && ((c + 1) == IBArray[0].colIndex))
      {
        return "right";
      }
      else
      {
        return "stay";
      }
    }
    private void showImageBoxMsg(imageBox ib)
    {
      ib.SysMsg("ib name : " + ib.Name,
    ", indexOfArrlyIBArray : " + ib.indexOfAllIBArray.ToString(),
    ", IBArray postion on " + ib.indexOfAllIBArray.ToString(),
    ", rowIndex : " + IBArray[ib.indexOfAllIBArray].rowIndex.ToString(),
    ", cowIndex : " + IBArray[ib.indexOfAllIBArray].colIndex.ToString());
    }
  }
}
using System;
using System.Collections.Generic;
using System.Linq;
using System.Net;
using System.Windows;
using System.Windows.Controls;
using System.Windows.Documents;
using System.Windows.Input;
using System.Windows.Media;
using System.Windows.Media.Animation;
using System.Windows.Shapes;

namespace ImageClip_Puzzles
{
public partial class imageBox : UserControl
{
 int separaNum = 3;
 int imgSize = 160;
 public int rowIndex = 0;
 public int colIndex = 0;
 public int orgiRowIndex = 0;
 public int orgiColIndex = 0;
 public int indexOfAllIBArray = 99;

 Point currentBorderPosition = new Point();
 public imageBox()
 {
  InitializeComponent();
 }
 public void setInfo(int indexOfArray,int rIndex,
      int cIndex,int separateNum,int imageSize)
 {
  indexOfAllIBArray = indexOfArray;
  separaNum = separateNum;
  imgSize = imageSize;
  imageUV(rIndex, cIndex);
  this.Name =
   "R(" + rIndex.ToString() + ")C(" + cIndex.ToString() + ")";
  rowIndex = rIndex;
  colIndex = cIndex;
  orgiRowIndex = rIndex;
  orgiColIndex = cIndex;
  animaRecordInfo(indexOfArray);
 }
 private void animaRecordInfo(int index)//, string name)
 {
  moveImage_Direct_Up.SetValue(myRecorder.record_ImageBox, this);
  moveImage_Direct_Left.SetValue(myRecorder.record_ImageBox, this);
 }
 private void imageUV(int indexU,int indexV)
 {
  ImageAreaTransform.X = indexV * 160;
  ImageAreaTransform.Y = indexU * 160;
  this.boardPosition.X = ImageAreaTransform.X;
  this.boardPosition.Y = ImageAreaTransform.Y;
  currentBorderPosition =
     new Point(ImageAreaTransform.X,ImageAreaTransform.Y);
  msgPos.X = ImageAreaTransform.X;
  msgPos.Y = ImageAreaTransform.Y;
 }
 public void setGridPosition(int rowIndex, int colIndex)
 {
  this.SetValue(Grid.RowProperty, rowIndex);
  this.SetValue(Grid.ColumnProperty, colIndex);
 }
 public void setImageColor(byte r, byte g, byte b)
 {
  Color c = Color.FromArgb(255, r, g, b);
  imageColor.Fill = new SolidColorBrush(c);
  imageColor.Opacity = 0.7;
 }
 public void SysMsg(string msg)
 {
  imgSysMsg1.Text = msg;
 }
 public void SysMsg(string msg1, string msg2)
 {
  imgSysMsg1.Text = msg1;
  imgSysMsg2.Text = msg2;
 }
 public void SysMsg(string msg1, string msg2, string msg3)
 {
  imgSysMsg1.Text = msg1;
  imgSysMsg2.Text = msg2;
  imgSysMsg3.Text = msg3;
 }
 public void SysMsg(string msg1, string msg2,
           string msg3, string msg4)
 {
  imgSysMsg1.Text = msg1;
  imgSysMsg2.Text = msg2;
  imgSysMsg3.Text = msg3;
  imgSysMsg4.Text = msg4;
 }
 public void SysMsg(string msg1, string msg2,
           string msg3, string msg4, string msg5)
 {
  imgSysMsg1.Text = msg1;
  imgSysMsg2.Text = msg2;
  imgSysMsg3.Text = msg3;
  imgSysMsg4.Text = msg4;
  imgSysMsg5.Text = msg5;
 }
 public void moveImageTo(string dir)
 {
  SysMsg("");
  switch (dir)
  {
   case "up":
    this.UpAnima.From =
     Convert.ToDouble( imageGrid.GetValue(Canvas.TopProperty));
    this.UpAnima.To = this.UpAnima.From - imgSize;
    this.borderAnima_Up.From = this.boardPosition.Y;
    this.currentBorderPosition.Y -= imgSize;
    this.borderAnima_Up.To = this.currentBorderPosition.Y;
    this.moveImage_Direct_Up.Begin();
    break;
   case "down":
    this.UpAnima.From =
     Convert.ToDouble(imageGrid.GetValue(Canvas.TopProperty));
    this.UpAnima.To = this.UpAnima.From + imgSize;
    this.borderAnima_Up.From = this.currentBorderPosition.Y;
    this.currentBorderPosition.Y += imgSize;
    this.borderAnima_Up.To = this.currentBorderPosition.Y;
    this.moveImage_Direct_Up.Begin();
    break;
   case "left":
    this.LeftAnima.From =
     Convert.ToDouble(imageGrid.GetValue(Canvas.LeftProperty));
    this.LeftAnima.To = this.LeftAnima.From - imgSize;
    this.borderAnima_Left.From = this.currentBorderPosition.X;
    this.currentBorderPosition.X -= imgSize;
    this.borderAnima_Left.To = this.currentBorderPosition.X;
    this.moveImage_Direct_Left.Begin();
    break;
   case "right":
    this.LeftAnima.From = Convert.ToDouble(imageGrid.GetValue(Canvas.LeftProperty));
    this.LeftAnima.To = this.LeftAnima.From + 160;
    this.borderAnima_Left.From =
      this.currentBorderPosition.X;
    this.currentBorderPosition.X += imgSize;
    this.borderAnima_Left.To =
      this.currentBorderPosition.X;
    this.moveImage_Direct_Left.Begin();
    break;
   default:
    SysMsg("default in dir");
    break;
  }
  msgPos.X = this.currentBorderPosition.X + 5;
  msgPos.Y = this.currentBorderPosition.Y + 10;


 }
 public void resetCurrentPosition(int r,int c)
 {
  this.rowIndex = r;
  this.colIndex = c;
     showInfo();
 }
 public void showInfo()
 {
  SysMsg("boardPosition(X,Y): (" + this.boardPosition.X.ToString() +
    ","+ this.boardPosition.Y.ToString() +")",
   "TopLeft: (" + imageGrid.GetValue(Canvas.TopProperty).ToString() +
   "," + imageGrid.GetValue(Canvas.LeftProperty).ToString() ,
   "RowIndex : " + this.rowIndex.ToString(),
   "ColIndex : " + this.colIndex.ToString(),
   "name : "+this.Name);
 }
}
}
4.最後是
using System;
using System.Net;
using System.Windows;
using System.Windows.Controls;
using System.Windows.Documents;
using System.Windows.Ink;
using System.Windows.Input;
using System.Windows.Media;
using System.Windows.Media.Animation;
using System.Windows.Shapes;

namespace ImageClip_Puzzles
{
 public class myRecorder
 {
  public static readonly DependencyProperty record_ImageBox =
   DependencyProperty.RegisterAttached(
    "recordImageBox",
    typeof(imageBox),
    typeof(myRecorder),
    null);
  public static void recordImageBox(DependencyObject obj,
                   imageBox ib)
  {
   obj.SetValue(record_ImageBox, ib);
  }
  public static imageBox readImageBox(DependencyObject obj)
  {
   return (imageBox)obj.GetValue(record_ImageBox);
  }
 }
}
先前已有介紹如何在Silverlight元件裡額外加入一個屬性,「myRecorder.cs」的內容即新增的屬性的Class。
就本篇內容來說,遊戲時「圖片區塊的移動」的動作已寫好。此外為了除蟲方便,程式中加入了「SysMsg」Function,執行時我們能夠簡單看到目前圖片位置的屬性值。
執行結果
Silverlight with C#:★★★ Attached Property ★★★
『對Silverlight元件增加額外的屬性』,在許多地方都非常之好用:
1.對專案新增一個 .cs 檔案:
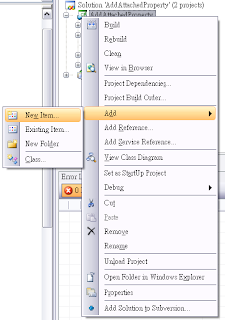
在此對新增的Class命名為「addedProperty」
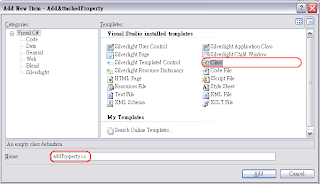
2.addProperty.cs最初內容為:
請加入以下內容:
3.接著測試程式能否加入此Attached Property,先在主要的 .xmal檔中加入以下內容:
4.加入「onLoad」function,簡單的產生一個Silverlight元件以測試結果。:
在Attached Property裡,第一個屬性為 bool,第二個屬性為 string,程式載入後,以MessageBox顯示我們在執行中加入的Property.你甚至可以加入C#中的Object或是Silverlight元件所屬頂層Object.
1.對專案新增一個 .cs 檔案:

在此對新增的Class命名為「addedProperty」

2.addProperty.cs最初內容為:
public class addProperty // class name : the property class
{
}
請加入以下內容:
public static readonly DependencyProperty addedMsg =
    DependencyProperty.RegisterAttached(
  //Name of the property
  "addedProperty",
  //Type of the property
  typeof( bool ),
  //Type of the provider of the registered attached property
  typeof( addProperty ),
  //Callback invoked in case the property value has changed
  null );
public static readonly DependencyProperty addedMsg2 =
    DependencyProperty.RegisterAttached(
  "addedProperty2",
  typeof(string),
  typeof(addProperty),
  null);
3.接著測試程式能否加入此Attached Property,先在主要的 .xmal檔中加入以下內容:
<Grid x:Name="LayoutRoot">
    <TextBlock x:Name="myText" Text="message" Loaded="onLoad"/>
</Grid>
4.加入「onLoad」function,簡單的產生一個Silverlight元件以測試結果。:
private void onLoad(object sender, RoutedEventArgs e)
{
 myText.SetValue(addProperty.addedMsg, false);
 MessageBox.Show(myText.GetValue(addProperty.addedMsg).ToString());
 myText.SetValue(addProperty.addedMsg2, "my name is Creat");
 MessageBox.Show(myText.GetValue(addProperty.addedMsg2).ToString());
}
在Attached Property裡,第一個屬性為 bool,第二個屬性為 string,程式載入後,以MessageBox顯示我們在執行中加入的Property.
2010年1月18日 星期一
Silverlight:Image U,V -- Part 3
本篇再介紹一種動態Clip Image的方法,先將以下程式碼加入UserControl:
接著加入以下程式碼至 .cs中:
本篇同part 1,使用了兩個Image,上層Image做事件的觸發,下層Image顯示效果,其中主要由
來控制Clip的效果。
執行結果
<Grid x:Name="LayoutRoot" Background="Gray" MouseLeftButtonUp="onUp"
  VerticalAlignment="Center" HorizontalAlignment="Center">
 <Grid.RowDefinitions>
  <RowDefinition Height="5"/>
  <RowDefinition Height="300"/>
  <RowDefinition Height="5"/>
 </Grid.RowDefinitions>
 <Grid.ColumnDefinitions>
  <ColumnDefinition Width="5"/>
  <ColumnDefinition Width="300"/>
  <ColumnDefinition Width="5"/>
 </Grid.ColumnDefinitions>
 <Grid Grid.Row="1" Grid.Column="1">
  <Rectangle x:Name="posRect"/>
  <Image x:Name="img_show" Stretch="Fill"
    Source="imgs/Orz.png" Opacity="0.9">
   <Image.Clip>
    <RectangleGeometry Rect="0,0,100,100">
     <RectangleGeometry.Transform>
      <TranslateTransform X="0" Y="0" x:Name="clipPosCtrl"/>
     </RectangleGeometry.Transform>
    </RectangleGeometry>
   </Image.Clip>
  </Image>
  <Image x:Name="img_bg" Stretch="Fill"
    Source="imgs/Orz.png" Opacity="0.1"
    MouseLeftButtonDown="onDown" MouseMove="onMove"/>
 </Grid>
</Grid>
接著加入以下程式碼至 .cs中:
private void onDown(object sender, MouseButtonEventArgs e)
{
 mouseIsClick = true;
}
 bool mouseIsClick = false;
private void onUp(object sender, MouseButtonEventArgs e)
{
 mouseIsClick = false;
}
private void onMove(object sender, MouseEventArgs e)
{
 if(!mouseIsClick) return;
 clipPosCtrl.X = e.GetPosition(posRect).X - 50;
 clipPosCtrl.Y = e.GetPosition(posRect).Y - 50;
}
本篇同part 1,使用了兩個Image,上層Image做事件的觸發,下層Image顯示效果,其中主要由
 <RectangleGeometry.Transform>
  <TranslateTransform X="0" Y="0" x:Name="clipPosCtrl"/>
 </RectangleGeometry.Transform>
來控制Clip的效果。
執行結果
2010年1月17日 星期日
Silverlight:Image U,V -- Part 2
以下Grid內容包括四個Image元件,每個Image元件都使用同一張.png圖檔,其大小為200 x 200,Image元件各別秀出100 x 100的左上、右上、左下、右下四個部份。
執行結果
其中<RectangleGeometry Rect="startX,startY,W,H" /> 指定的數值內容為「X軸起始位置,Y軸起始位置,X方向顯示寬度,Y方向顯示寬度」。
<Grid x:Name="LayoutRoot" Background="Gray" Width="205" Height="205">
 <Image x:Name="img_TL" Stretch="None" Source="Orz.png">
  <Image.RenderTransform>
   <TranslateTransform X="-2.5" Y="-2.5"/>
  </Image.RenderTransform>
  <Image.Clip>
  <RectangleGeometry Rect="0,0,100,100" />
  </Image.Clip>
 </Image>
 <Image x:Name="img_TR" Stretch="None" Source="Orz.png">
  <Image.RenderTransform>
   <TranslateTransform X="2.5" Y="-2.5"/>
  </Image.RenderTransform>
  <Image.Clip>
   <RectangleGeometry Rect="100,0,100,100" />
  </Image.Clip>
 </Image>
 <Image x:Name="img_BL" Stretch="None" Source="Orz.png" >
  <Image.RenderTransform>
   <TranslateTransform X="2.5" Y="2.5"/>
  </Image.RenderTransform>
  <Image.Clip>
   <RectangleGeometry Rect="100,100,100,100" />
  </Image.Clip>
 </Image>
 <Image x:Name="img_BR" Stretch="None" Source="Orz.png" >
  <Image.RenderTransform>
   <TranslateTransform X="-2.5" Y="2.5"/>
  </Image.RenderTransform>
  <Image.Clip>
   <RectangleGeometry Rect="0,100,100,100" />
  </Image.Clip>
 /Image>
</Grid>
執行結果
其中
訂閱:
文章 (Atom)