搜尋此網誌

2009年12月29日 星期二

Silverlight:Web Load Media

建立一個Button物件,按下後能動態載入影片檔案。這樣的動作可以運用於「需要時才載入」,避免Silverlight的xap檔案過大導致載入時間過長。

在撰寫程式之前,請先新增一個新的專案到目前的solution中,並且將影象檔案置入該新增的專案:
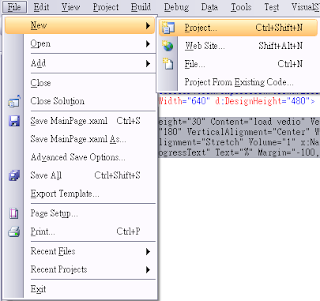
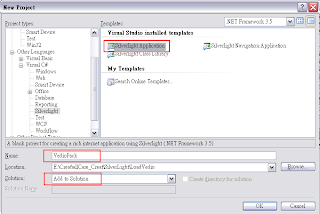
新增專案至Solution,本篇將新增的專案命名為「VedioPack」
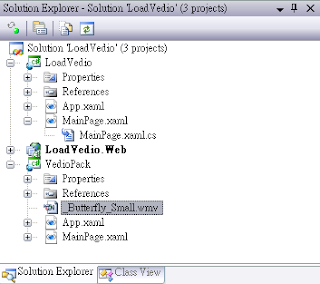
將影片檔加入專案中,在此以「_Butterfly_Small.wmv」為例:

在 .xmal檔中加入以下程式碼:

<Grid x:Name="LayoutRoot">
 <Button Width="100" Height="30" Content="load vedio" VerticalAlignment="Top"
Click="loadVedio" />
  <MediaElement Height="180" VerticalAlignment="Center" Width="240"
   d:LayoutOverrides="Width" HorizontalAlignment="Stretch"
   Volume="1" x:Name="vedio" Stretch="Uniform"/>
 <TextBlock x:Name="progressText" Text="%" Margin="-100,0"
  HorizontalAlignment="Center" VerticalAlignment="Center"/>
</Grid>


上述程式碼中,TextBlock元件將會顯示目前Media檔案的下載進度。接著在 .cs 檔案加入以下程式內容:

當按鈕被Click時:

private void loadVedio(object sender, RoutedEventArgs e)
{
  WebClient wc = new WebClient();
  wc.DownloadProgressChanged +=
  new DownloadProgressChangedEventHandler(wc_DownloadProgressChanged);
  wc.OpenReadCompleted +=
  new OpenReadCompletedEventHandler(wc_OpenReadCompleted);
  wc.OpenReadAsync(new Uri("ClientBin/VedioPack.xap", UriKind.Relative));
}

下載中,檔案下載進度的反應:

void wc_DownloadProgressChanged(object sender, DownloadProgressChangedEventArgs e)
{
  progressText.Text = e.ProgressPercentage.ToString() + "%";
}

下載檔案的結果:

void wc_OpenReadCompleted(object sender, OpenReadCompletedEventArgs e)
{
  if ((e.Error == null) && (e.Cancelled == false))
  {
   try
   {
    StreamResourceInfo sri =
      new StreamResourceInfo(e.Result as Stream, null);
    Uri uri =
      new Uri("_Butterfly_Small.wmv", UriKind.Relative);
    StreamResourceInfo mediaStream = Application.GetResourceStream(sri, uri);
    this.vedio.SetSource(mediaStream.Stream);
    progressText.Visibility = Visibility.Collapsed;
   }
   catch(Exception ex)
   {
    System.Windows.Browser.HtmlPage.Window.Alert(ex.Message);
   }
  }
  else
  {
   MessageBox.Show(e.Error.ToString());
  }
}


執行結果
2009年12月28日 星期一

Silverlight:下載進度

1、先在 .xaml 檔內的UserControl加入以下程式碼:

<Grid x:Name="LayoutRoot" Height="100" Width="300" Loaded="downloadObj">
 <Rectangle Fill="Black" />
 <Rectangle x:Name="bg"  Fill="Red" Height="20" Width="200"
  HorizontalAlignment="Left" Margin="50,0"/>
 <Rectangle x:Name="bar" Fill="Yellow" Height="20" Width="1"
  HorizontalAlignment="Left" Margin="50,0"/>
 <TextBlock x:Name="progressText" Text="0%" FontSize="15"
  Foreground="White" HorizontalAlignment="Center"
  VerticalAlignment="Center"/>
</Grid>


2、接著生出一個檔案,將檔案放到專案的「ClientBin/」之下(與xap檔案同資料夾,在此以SilverlightVideoPlayerClassLibrary.zip為例)
3、在.cs檔寫入以下程式碼:

private void downloadObj(object sender, RoutedEventArgs e)
{
 WebClient wc = new WebClient();
 wc.DownloadProgressChanged +=
   new DownloadProgressChangedEventHandler(wc_DownloadProgressChanged);
 wc.OpenReadCompleted += new OpenReadCompletedEventHandler(wc_OpenReadCompleted);
 wc.OpenReadAsync(new Uri("SilverlightVideoPlayerClassLibrary.zip",
           UriKind.Relative));
}

void wc_OpenReadCompleted(object sender, OpenReadCompletedEventArgs e)
{
 if (e.Error == null)
 {

 }
 else
 {
  MessageBox.Show("error : " + e.Error.ToString());
 }
}

void wc_DownloadProgressChanged(object sender, DownloadProgressChangedEventArgs e)
{
 bar.Width = (double) e.ProgressPercentage * 2;
 progressText.Text = e.ProgressPercentage.ToString() + "%";
}


progressText為TextBlock元件,在此利用WebClient做到檔案下載的動作,以event handler取得下載進度,反應於 wc_DownloadProgresshanged中。

2009年12月23日 星期三

Silverlight:物件化管理----Add Reference

1、建立新的Sliverlight專案:


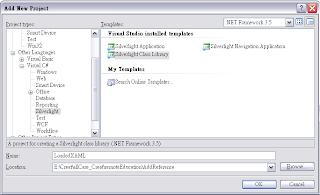
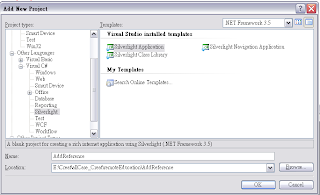
2、在相同的solution下,額外新增一個專案(Silverlight Class Library):


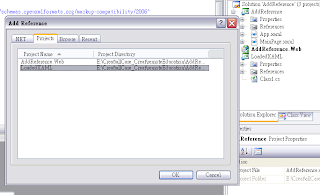
3、Project add reference,對主專案按下滑鼠右鍵,選擇「Add reference」,reference的對象則是先前新增的Project:

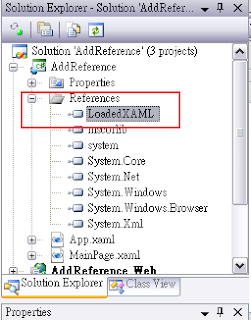
在主要專案找到「Reference」,會看見額外新增的專案已被加入


4、在額外新增的專案中加入xmal檔,並建立內容:


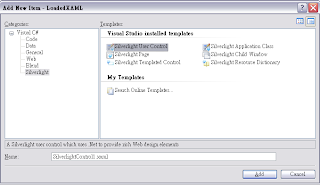
選擇「Silverlight User Control」並指定xmal檔名


新增的專案中,其新增的xmal檔內容如下

<UserControl x:Class="LoadedXAML.execAnimation"
 xmlns="http://schemas.microsoft.com/winfx/2006/xaml/presentation"
 xmlns:x="http://schemas.microsoft.com/winfx/2006/xaml"
 Width="400" Height="300">
  <Grid x:Name="LayoutRoot" Loaded="whenLoaded">
   <Grid.Resources>
    <Storyboard x:Name="anima">
     <DoubleAnimation Storyboard.TargetName="path1"
       Storyboard.TargetProperty=
       "(Rectangle.RenderTransform).X"
       From="0" To="300" AutoReverse="true"
       BeginTime="0:0:0"
       Duration="0:0:2" RepeatBehavior="Forever"/>
    </Storyboard>
   </Grid.Resources>
  <Grid>
   <Rectangle x:Name="path1" Opacity=".65" Fill="orange"
    Height="100" Width="100" RadiusX="10" RadiusY="10" >
    <Rectangle.RenderTransform>
     <TranslateTransform X="0"/>
    </Rectangle.RenderTransform>
   </Rectangle>
  </Grid>
 </Grid>
</UserControl>

新增的xmal檔其.cs內容如下:

using System;
using System.Collections.Generic;
using System.Linq;
using System.Net;
using System.Windows;
using System.Windows.Controls;
using System.Windows.Documents;
using System.Windows.Input;
using System.Windows.Media;
using System.Windows.Media.Animation;
using System.Windows.Shapes;

namespace LoadedXAML
{
public partial class execAnimation : UserControl
{
public execAnimation()
{
InitializeComponent();
}

private void whenLoaded(object sender, RoutedEventArgs e)
{
anima.Begin();
}

}
}


5、主xmal檔請加入一個Button元件:

<Button x:Name="Button_LOAD" Width="100" Height="60"
  Content="Load" Click="doLoad" />

其.cs內容需加入「doLoad」function,程式內容如下:

private void doLoad(object sender, RoutedEventArgs e)
{
 UserControl myCtrl = new LoadedXAML.execAnimation();
 Grid myGrid = (Grid) this.FindName("LayoutRoot");
 myGrid.Children.Add(myCtrl);
}


程式的兩個Project已建立連結,主Project在按下Button後將能夠取得先前新增的xmal檔內容。

2009年12月15日 星期二

Silverlight:Set Color、Set Margain

建立一個名為「newRect」的Rectangle元件,在cs檔中指定Rectangle裡 Fill的顏色值如下:

 Color newColor = Color.FromArgb(255, 0xEE, 0xEE, 0xEE);
 newRect.Fill = new SolidColorBrush(newColor);

或者在new一個Rectangle時你也可以這樣做:

 Color newColor = Color.FromArgb(255, 0xEE, 0xEE, 0xEE);
Rectange rect =
  new Rectange() { Fill = new SolidColorBrush(newColor)};


指定Margin上、下、左、右的方式如下:

 Thickness newTk = new Thickness();
 newTk.Top = (double)5;
 newTk.Left = (double)5;
 newTk.Right = (double)5;
 newTk.Bottom = (double)5;
 newRect.SetValue(Rectangle.MarginProperty, newTk);

SilverLight:指定Grid某一欄位的寬、高

1、在xmal檔中,對目標欄位設定「x:name」,例如:

<Grid x:Name="PS_Container" Visibility="Visible" Height="500">
 <Grid.ColumnDefinitions>
  <ColumnDefinition x:Name="container_Grid_Width1" Width="1*"/>
  <ColumnDefinition x:Name="container_Grid_Width2" Width="4*"/>
  <ColumnDefinition x:Name="container_Grid_Width3" Width="6*"/>
 </Grid.ColumnDefinitions>
</Grid>

在cs檔中,指定寬度的方式(以下分別指定Colunm1、Colunm2、Colunm3):

 GridLength gl = new GridLength(82);
 container_Grid_Width1.Width = gl;
 gl = new GridLength(328);
 container_Grid_Width2.Width = gl;
 gl = new GridLength(Application.Current.Host.Content.ActualWidth - 410);
 container_Grid_Width3.Width = gl;


以上將欄位寬度分成82、328、(410-328-82)等大小,其中Application.Current.Host.Content.ActualWidth能夠取得目前頁面的實際寬度。

Silverlight:讓Button能夠使用 MouseLeftButtonDown & Up

Silverlight在使用Button時,只有「Click」事件能夠產生動作,而「MouseLeftButtonDown」及「MouseLeftButtonUp」…等多個Mouse動作都無作用。
在某些狀況下我們可能需要「MouseDown」及「MouseUp」配合使用,針對這項需求,可使用以下方式解決--

在此以RepeatButton舉例:
對xmal檔中的button物件指定「Click」、「MouseLeftButtonDown」、「MouseLeftButtonUp」等事件,並設定「ClickMode」為「Hover」:

<RepeatButton  Opacity="0.01" Width="24" Height="26" Interval="100"
  Margin="-8" ClickMode="Hover"
  Click="on_tomorrow" MouseLeftButtonDown="on_tomorrow_down"
  MouseLeftButtonUp="on_tomorrow_up"/>

在cs檔中寫前對應的function。將「ClickMode」設定為「Hover」時,只要mouse置於button上就會觸發Click事件,mouse置於button上時,以一個bool變數去判斷mouse是不是Down的狀態,即可使用MouseLeftButtonDown及MouseLeftButtonUp的功能:

 bool butmDown = false;
 private void on_tomorrow(object sender, RoutedEventArgs e)
 {
  if (!butmDown) return;
  …//when mouse down, do something on this code..
  …
 }
 private void on_tomorrow_down(object sender, MouseButtonEventArgs e)
 {
  butmDown = true;
 }
 private void on_tomorrow_up(object sender, MouseButtonEventArgs e)
 {
  MessageBox.Show("release mouse");
  butmDown = false;
 }

C#:Silper 運用--以指定tag拆解字串

string下的「Splite」方法,能夠指定特定的字元,將一個字串分解成一組字串陣列,例如以下程式內容會以MessageBox顯示a、b、c、d、e、f、g:

 string strData = "a;b;c;d;e;f;g";
string[] separator = new string[] { ";" };
 string[] strSplitArr =
  strData.Split(separator, StringSplitOptions.RemoveEmptyEntries);
 foreach (string arrStr in strSplitArr)
 {
  MessageBox.Show(arrStr);
 }

再者,以下內容能夠產生「Apple」、「Banana」、「Cantaloupe」:

 string[] separator = new string[] { "[", "]" };
 string[] strSplitArr =
  strData.Split(separator, StringSplitOptions.RemoveEmptyEntries);
 foreach (string arrStr in strSplitArr)
 {
  MessageBox.Show(arrStr);
 }

或者有必要時,使用[Fruit] + [/Fruit]來將字串拆解成「Apple」、「Banana」、「Cantaloupe」:

 string strData =
  "[Fruit]Apple[/Fruit][Fruit]Banana[/Fruit][Fruit]Cantalopue[/Fruit]";
 string[] separator = new string[] { "[Fruit]", "[/Fruit]" };
 string[] strSplitArr =
  strData.Split(separator, StringSplitOptions.RemoveEmptyEntries);
 foreach (string arrStr in strSplitArr)
 {
  MessageBox.Show(arrStr);
 }

2009年12月7日 星期一

Silverlight: Cookie的使用

首先需要引用…

using System.Windows.Browser;


寫入cookie:以下內容會將「Key=Nothing」寫入cookie中

DateTime expiration = DateTime.UtcNow + TimeSpan.FromDays(2000);
string cookie = String.Format("{0}={1};expires={2}",
      "Key", "Nothing", expiration.ToString("R"));
HtmlPage.Document.SetProperty("cookie", cookie);


刪除cookie內容值:以下內容會將「Key」值移除
 DateTime expireDate = DateTime.Now - TimeSpan.FromDays(1);
 string expires = ";expires=" + expireDate.ToString("R");
 string cookie = "Key=" + expires;
 HtmlPage.Document.SetProperty("cookie", cookie);


讀取cookie內容值:以下將會找出「Key」的內容值,並以MessageBox提示
 String[] cookies = HtmlPage.Document.Cookies.Split(';');
 string key = "Key=";
 foreach (string s in cookies)
 {
  string ck = s.Trim();
  if (ck.StartsWith(key, StringComparison.OrdinalIgnoreCase))
  {
   string[] vals = ck.Split('=');
   MessageBox.Show(vals[1]);
  }
 }

2009年12月3日 星期四

Silverlight、C#:Post in HttpWebRequest

以下主要在從事Silverlight做Web Request,以Post對Server要求資料時用上:

 WebClient wc_DoLogin = new WebClient();
wc_DoLogin.UploadStringCompleted += new
   UploadStringCompletedEventHandler(wc_DoLogin_UploadStringCompleted);
 wc_DoLogin.Headers["content-type"]
   = "application/x-www-form-urlencoded";
 wc_DoLogin.UploadStringAsync(
  new Uri(Url, UriKind.Absolute),
  "POST",
  "欄位1=欄位值&欄位2=欄位值2");

Server回應將會在wc_DoLogin_UploadStringCompleted被接收:

void wc_DoLogin_UploadStringCompleted
(object sender, UploadStringCompletedEventArgs e)
{
MessageBox.Show("result is : " + e.Result);
}